Plan your VBS
VBS is a great way to connect with and educate kids in your area, but it can be hard to keep track of all the details. Planning Center can help you stay organized and make sure everything runs smoothly using the Registrations, People, Services, and Check-Ins products!
If you're not already using one of those products, sign up with the free 30-day trial, and then check out the rest of this article and this video series to learn how to use multiple Planning Center products to pull off big events like VBS!
Open registration
First, set up online registrations for attendees and volunteers. When you create the signup, set the name, add the first date/time of the event, and choose Named attendees.
Create selection types
Add the selection types based on pricing or how you plan to group kids during the event, such as teams or classes organized by age or grade level. You can also add a selection type for volunteers.
When creating your selection types, choose which fields of important personal information you want to collect about the attendees using each selection. This information will update their People profile.
Tip
Need to break up preschoolers by age? Do you live somewhere that uses a different grade structure than the default setting? An organization administrator can adjust your account's grade list in Account settings.
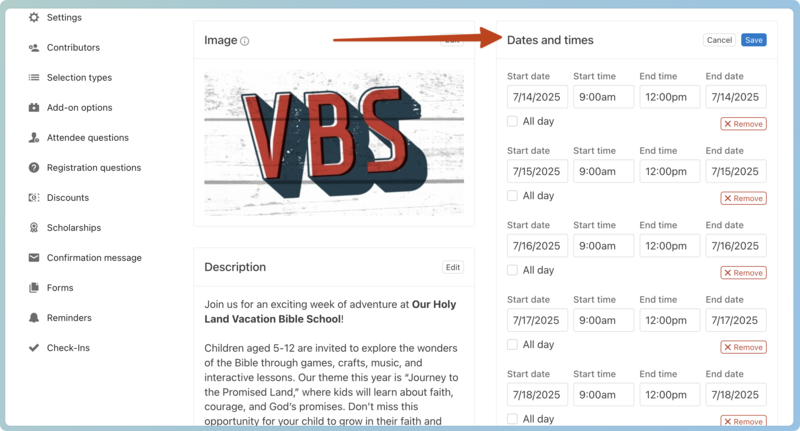
Add dates and times
From the About tab in the Configuration tab, add times for your entire schedule for the week of VBS. These times will show up on the event itself.
Set up assignments
If you typically break people into teams at VBS, you can set up assignments with filters.
Tip
To assign people based on the filters set up for each assignment area, go to the Unassigned tab and select Auto Assign.
Finish setting up your event and open it for people to register!
Share the signup
Once the signup is created, you want people to be able to register. From the Registrations event, select View on Church Center and copy the URL to share it with people.
Email parents
Create a list of parents in your database and send them the event registration link.
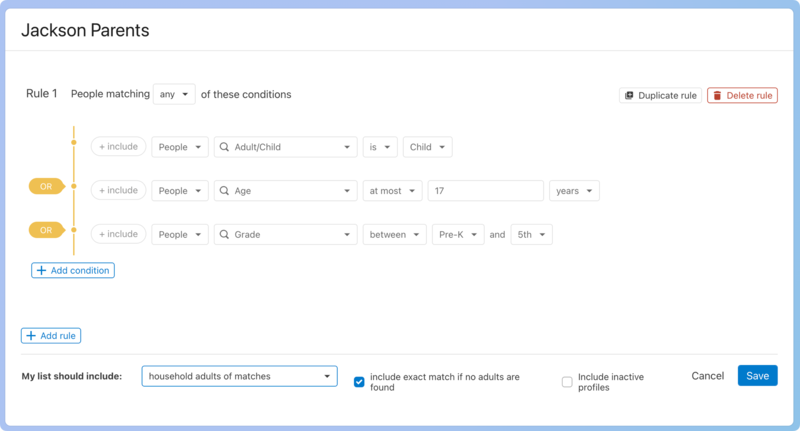
In People, select Lists in the top navigation.
Select New list.
Select Add rule.
In the Select a condition box, search for Adult/Child.
To the right of the is box, choose Child from the dropdown.
Select Add a condition.
In the Select a condition box, search for Age.
Change between to at most.
To the right of the at most box, enter the number 17.
Select Add a condition.
In the Select a condition box, search for Grade.
Change is to between.
Select the youngest and oldest grade allowed to attend from the dropdowns.
Change all to any from the dropdown in People matching all of these conditions at the top of the page.
In the My list should include: section at the bottom of the page, select household adults of matches. This will ensure you email the parents instead of the children.
If you know some kids don't have parents in their household or have become inactive, check the include exact matches if no adults are found or include inactive profiles boxes.
Once you create the list, send them a Church Center message or a styled email with Mailchimp to track who has opened and seen the message.
Tip
Don't forget to email people who volunteered or attended last year!
Schedule volunteers
Communicating with volunteers is vital in making VBS a great week for kids. Schedule all your volunteers in Services so they know each day's schedule and where they're supposed to be.
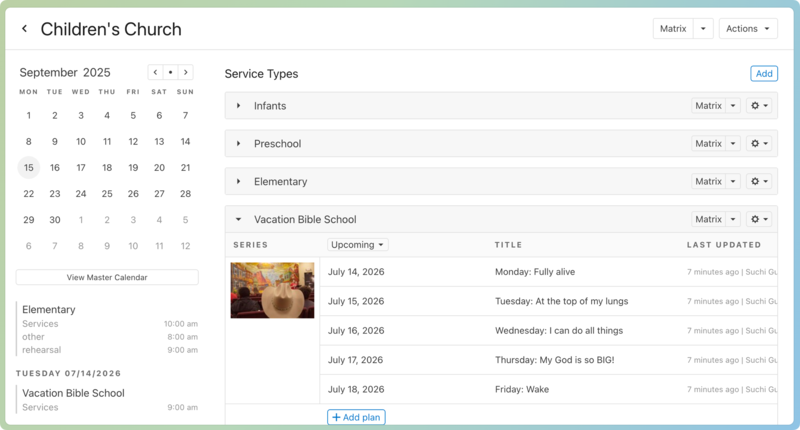
Create plans and teams
Create a new service type for your VBS, setting the frequency to Daily, and add each day as a separate plan.
When you create the first plan, use these tips to easily schedule people to the plan once they've registered.
Add the event time as service times as well, and add additional times for rehearsals or call times as needed.
Make sure your service type frequency is daily.
Add any order of service elements, including any attachments , and then copy that plan as many times as you have days.
Once your plan is in place, create a Secure Team, and add positions to the team.
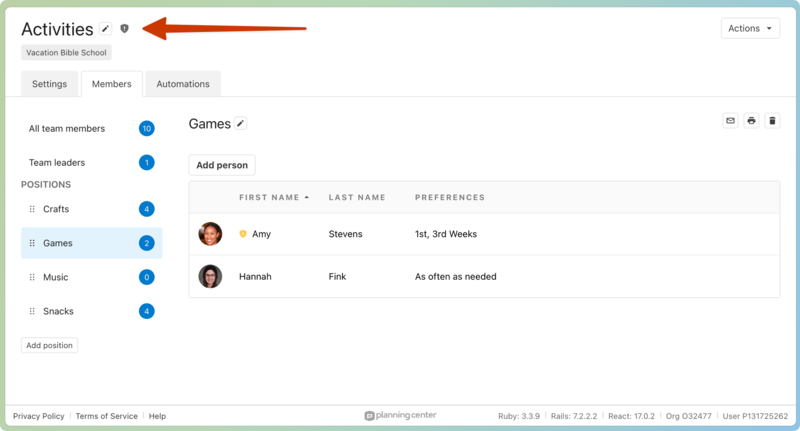
Automatically add attendees to positions
Once your team and positions are set up in Services, you can automatically add people to those positions as they register.
Create lists in People for each assignment area from your Registrations event.
Use automations to add registered attendees to their position in Services.
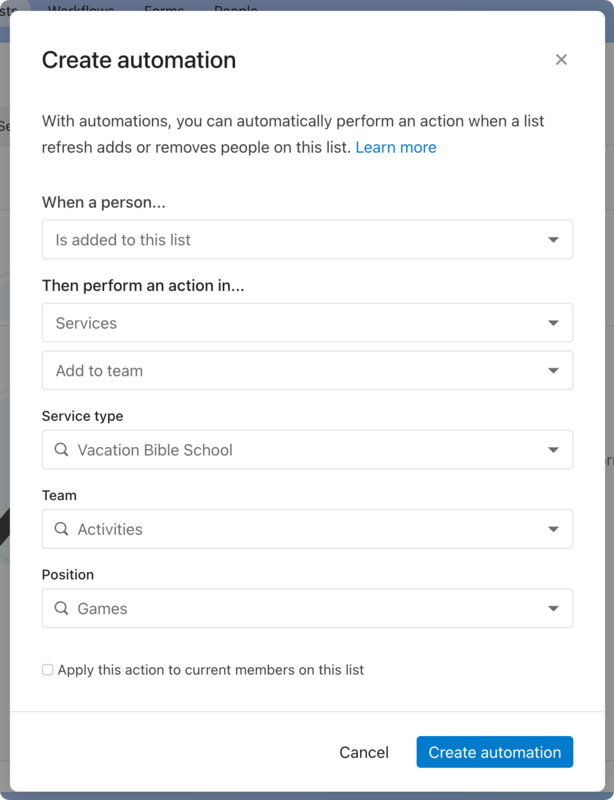
When people register, they will be added to the correct list the following morning, and the automation will add them to the appropriate team.
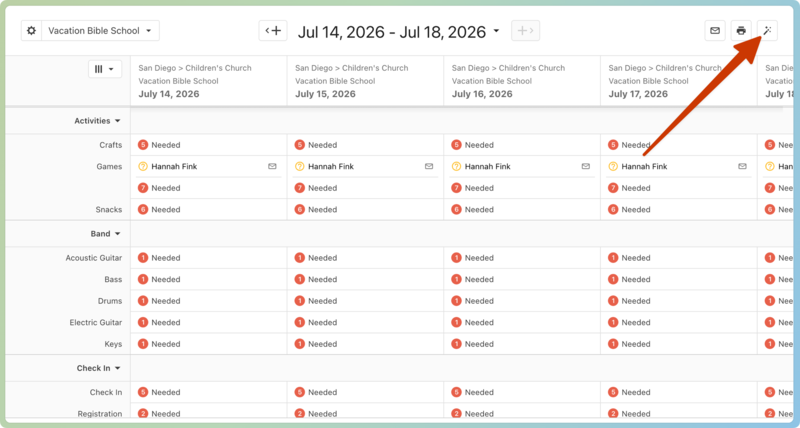
Schedule people to plans
Use needed positions to define how many people you want to be in each position. When you're ready to schedule, load all your plans into the matrix and select auto-schedule to add people into positions on the plans.
Once people are in their positions, select email these people, customize your message, and send an email to all your volunteers. The email from the Matrix will show all the dates and times, so let them know they can use the buttons in the email to:
Confirm for all dates.
Decline for a day they won't be there.
View the schedule.
Respond to the email with any questions they have for you.
Check in kids and volunteers
It's time to greet all those people with smiling faces! Create a Check-Ins event from your signup to automatically check kids and volunteers into the correct location based on their assignment, print custom labels, check in via QR code, and scan to check out.
Want to watch a video before you get started? No problem! This ten-minute video will show you the Registrations and Check-ins integration in action.
From the Registrations page on your signup, select Set up Check-Ins for this signup from the Attendance dropdown.
Important
You must have editor permissions in Check-Ins to set up this integration.
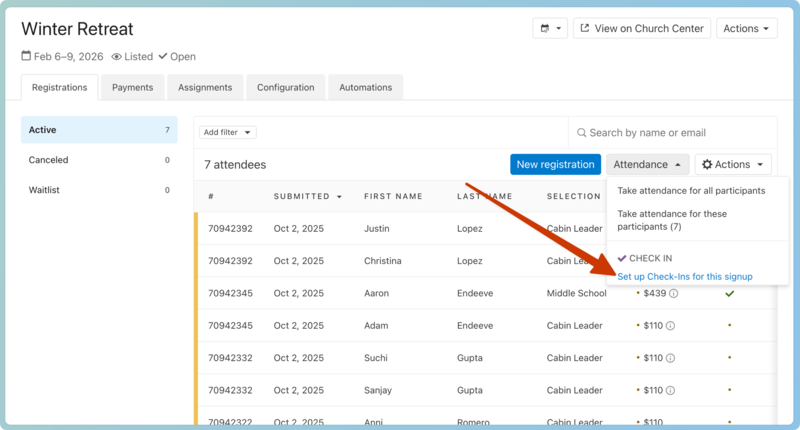
Then, select Create Check-Ins event to open the event creation wizard in Check-Ins!
Update Check-Ins event settings
Set up check-in times, event frequency, labels, and other details by updating the settings for your integrated event.
On the Events page in Check-Ins, select your VBS event listed with the Registrations logo next to the title.
On the Settings tab, select the Daily / VBS frequency and add the event dates.
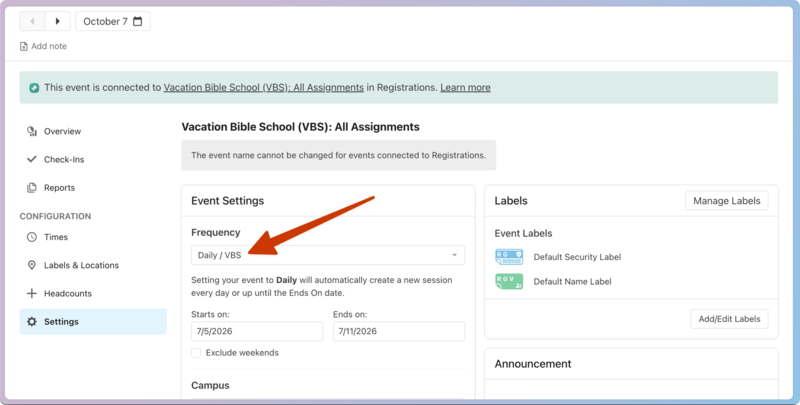
From the Times tab, select the time and create a check-in and check-out window by determining when the event will be accessible from the station. Update the Show at time to the earliest you want check-ins to begin, then set the Hide at time after check-outs.

Assignment types and areas are synced with your Check-Ins event and displayed as folders and locations. Any age/grade options or capacity settings you added to each area carry over as uneditable location filters.
Important
You must update the volunteer settings and labels for each location!
There are unique field options exclusive to creating custom labels for integrated VBS events.
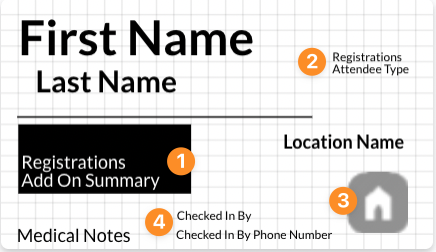 |
Displays any add-ons selected during registration.
Shows the person's selection type.
Adds the event logo.
Includes the name and phone number of the checked-in by person.
Use stations for attendance and security
VBS brings in a mix of attendees, including those who have registered, those who haven't, and those who are attending for the first time! Everyone needs to be accounted for, from when they walk in the door to pick-up time, and security is non-negotiable. Manned and roster stations, medical notes, emergency texting, and trusted people are all available tools to boost the confidence of your volunteers and parents.
Here are some best practices for during the event:
Have unregistered guests register before checking in so you can obtain the information you need to assign them to a location and reach anyone in an emergency.
Tip
Print and post the shareable QR code at the bottom of your signup page in Church Center to allow new attendees to register using their phones!
Use manned stations as your primary method of checking in. Volunteers can greet and connect with each family, update any missing information, or make last-minute assignment adjustments.
If you want to confirm that children who checked in made it to their classroom, set up a roster station on your classroom leaders' phones. They can access the information they need (only within the Show/Hide times you set up), text household adults when necessary, and see the medical notes and security codes of the kids in their care.
Show the event in Church Center if you want parents to pre-check their children in before arriving at the church! At the manned station, they can scan a QR code and have labels printed immediately.
Check out kids from the classroom or manned stations where volunteers can verify the adults allowed and not allowed for pickup.
Follow up
Once VBS is over, remember to follow up with people who attended! Try these options:
Send a follow-up email to all attendees.
Create any reports you might need.
Clean up your Planning Center account by archiving your VBS signup and service type, and setting people to inactive.
Since there are never any contracts for using Planning Center products, you can downgrade the subscription of any product you were using if you no longer need it. All the information will stay in the product in case you need it in the future, as long as you're still subscribed!