Lists overview
Lists let you filter your people based on their information and activity across all Planning Center applications. You can then share these lists with others or print them using reports.
Lists are also the starting point for a number of tools in People. The first part of this article will show you how to create a list, and then the second part will teach you how to use those list results.
Important
If a list owner is the only person with access to certain lists and their permissions in People are removed or their profile is inactivated, those lists will remain in the account but no longer sync to Mailchimp.
The Lists page shows options to create a new list, the lists you can access, messages sent to lists, and details about each list, including the last time it was refreshed and any active automations.
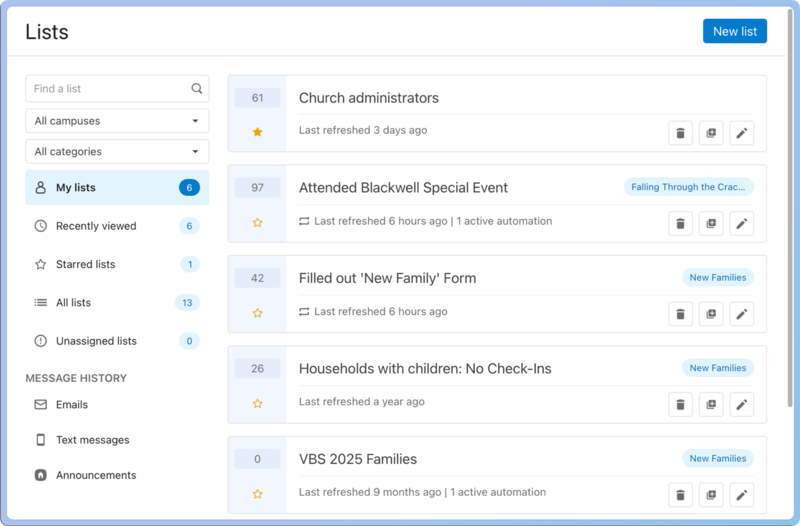
Search by a list's name or filter by campus, category, status, and more using the Filter menu options.
Choose an option at the top of the page to see different groups of lists:
All lists: lists you created, can manage, and can view.
My lists: lists you created and lists you can manage.
Recently viewed: the lists you've viewed recently.
Starred lists: lists to which you've added a star for quick access.
Unmanaged: This option is visible to organization administrators and includes all lists without a manager. You can add yourself as a manager to any list in this view.
Needs attention: lists with one or more invalid list conditions.
Select Message history to view past or scheduled emails, texts, or Church Center messages sent to lists.
Add a star to a list to access it quickly from the Starred lists tab.
Use the Actions button in a list's row to edit rules, manage automations, manage settings, duplicate it, or delete it.
Use the checkboxes on the left side of the list to change access to or delete multiple lists at once.
Create or edit a list
Add a name, rules, and conditions to a new list, or make changes to an existing list.
For a quick introduction, watch this video that explains how list conditions and rules work together. Then, follow the steps below to create your own list.
Create a new list
Select New List from the top right of the Lists page.
Select the +Add Rule button.
Select Untitled list in the top left of a new list to add a name and select Save to save your changes.
Set the rules and conditions for the list.
Select Save in the bottom right corner to finish.
Edit an existing list
To edit the name of an existing list, select the list then choose Edit title from the Actions dropdown and select Save to save your changes.
Select the Rules tab to edit the rules and conditions for the list and select Save to save your changes.
Group multiple conditions together to find people who match any, all, or none of the conditions in a single rule or more than one rule.
Important
To create rules or conditions for other products, you will need permissions in those products.
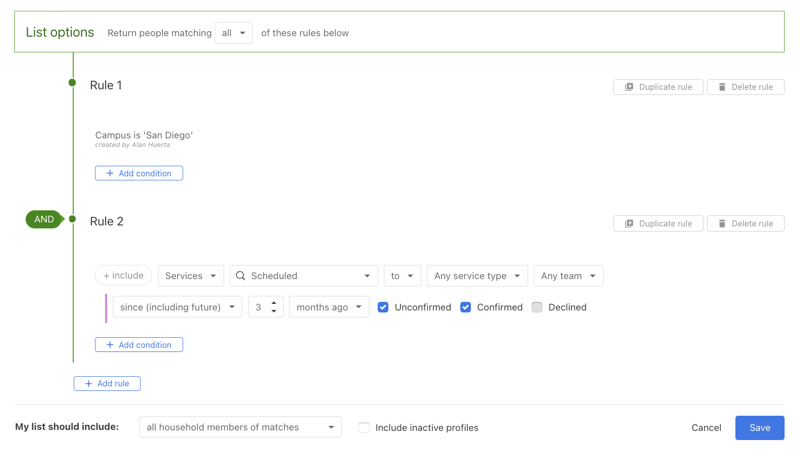
If you have multiple rules, you can look for people who meet all, any, or none of the rules.
If you have multiple conditions in a rule, you can look for people who meet all, any or none.
If you have three or more conditions, additional choices of at least, exactly, and at most are also available.
Select include on a condition to toggle the condition to exclude, excluding the people returned by that condition.
Choose the specific product in the first dropdown to search for activity related to that product.
Use the dropdowns to find a condition, or start typing to search for one.
Select the Duplicate or Delete button on the right of your rule to make a copy of or delete the rule, or hover over the condition to duplicate or delete it.
If a list manager has created a rule or condition, another manager can view or delete it, but not edit it. Duplicate the rule or condition created by another manager to create your own, then delete the previous one.
In the My list should include dropdown at the bottom, choose exact matches if you want to include people who directly meet the rule criteria.
Alternatively, you can include people related to someone who meets the rules, such as all household members, household children, household adults, household parents, or the household primary contact.
These related individuals don’t need to meet the rule criteria to be added to the list.
Select the Save button on the bottom right to view the list of people.
Editing the rules on an existing list will pause automations. Select the Automations tab to unpause.
Once you submit the list, select the Actions dropdown next to its name to Edit, Duplicate, or Delete it.
Tip
If you use the since x days condition, it refers to today plus the previous x days.
If you have a list with many rules and conditions and want to reference it from another list, add a condition that looks for People → In a list to find the people in the already-created list.
Warning
Do not set the list to auto-refresh.
When lists depend on each other, they need to be refreshed in the order they were created. You can't refresh the list of lists until the others have been refreshed.
To create a list of people who don't necessarily fit specific rules and conditions, create a Yes/No custom field and set that field to Yes for everyone you want on your manual list.
Then, you can generate a list based on who has Yes in that field. If you want to manually include or exclude specific people from an existing list, you can add a rule to include people with Yes or exclude people with No in that field.
Tip
You can also perform a bulk action to select multiple people without creating a list.
In the My list should include dropdown at the bottom, set to exact matches if you only want the people who match the rules to be included in the Results tab.
Or select to include other people based on their relationship with the person who matched, such as household children, household adults, or primary contacts.
View and use list results
Now that you know how to build a list, let's look at what you can do with the results!
The Results tab shows all the people who met your conditions and rules. Select an option from this tab to organize your results and take specific actions.
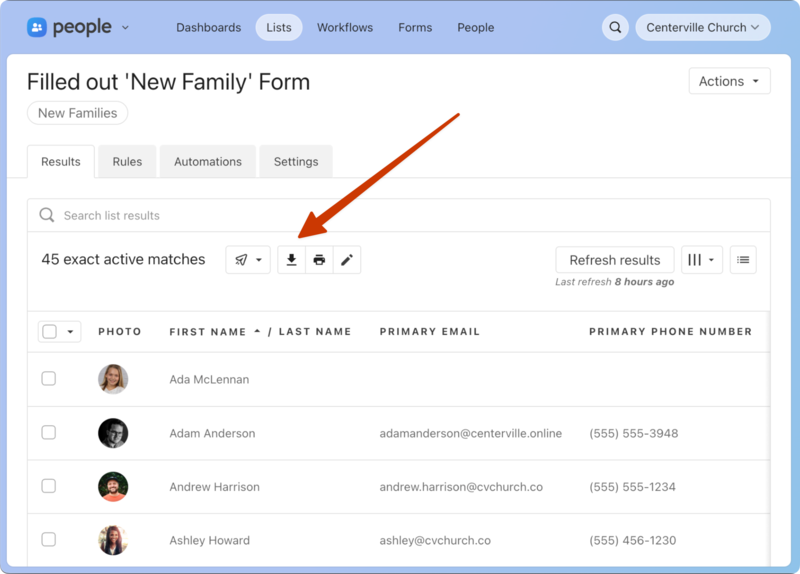
At the top left of the page, you'll find four tools to help you put your results to use.
Select the Send message to… button to send a text message, email, or Church Center message to people on the list.
Select the ⬇️ Export button to export the list to a CSV file.
Select the 🖨️ Print button to generate a report of people on the list. If printing the default report, verify that your columns show all the information you want to print. Anyone with Can export CSVs and reports permissions can export and generate reports of list data.
Select the ✏️ edit icon to perform a bulk action to make changes to profiles on the list.
Check the boxes to the left of specific profile names to send a message, export data, print, or perform a bulk action for only the selected people. If no boxes are checked, everyone will be included.
Customize your view
At the top right of the page, you'll find options to help you customize your view of the list results.
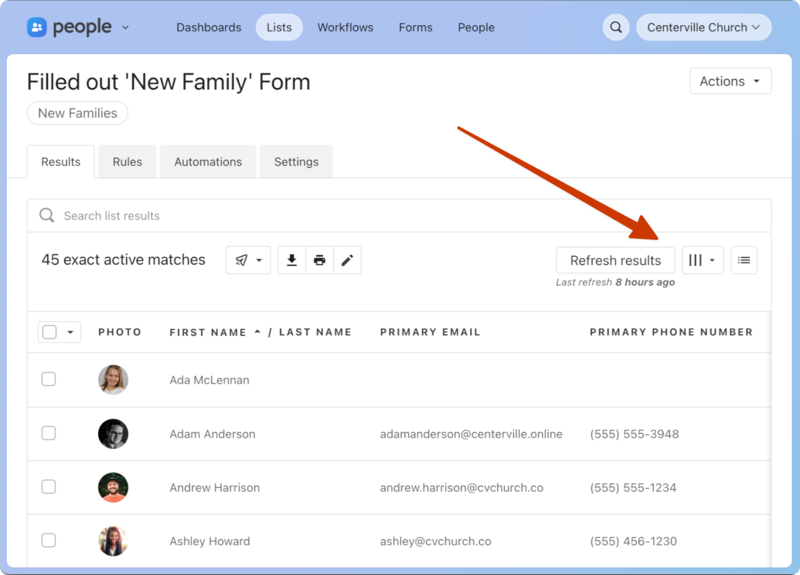
Select the Refresh results button to refresh the list and see the most current results.
Select the Select Columns button to add or remove columns from view.
Remove a column by selecting the X next to it.
Add a new column by checking the box next to it.
Rearrange the order in which the results are displayed by dragging and dropping.
Select the Show list rules button to see the total number of people who match each condition in the sidebar.
Select a column header to sort the results by that column. If you don't see a pointer cursor, the column is not sortable in the Results tab. Use the Export CSV… button to download a CSV file, allowing you to sort the results in a spreadsheet.
Use playlist mode
Playlist mode lets you quickly make changes to profiles in the list by navigating to and from each profile.
Select a person's name from the list to open their profile in playlist mode. Toggle to other profiles using the options in the blue bar at the top:
Choose the list name on the left to return to the list results.
Select next to navigate to the following result.
Select previous to navigate to the previous result.
Tip
Press shift + ? on a profile page to access keyboard shortcuts that open sections on the Personal tab for editing.