Remove a campus
Removing a campus from Planning Center requires more than just deleting it from account settings. You'll want to prepare your people, adjust filters on Church Center, and make changes throughout your account. Review the ways to prepare for closing a campus in this article, and then follow the steps at the end to delete it from Planning Center.
Prepare your congregation
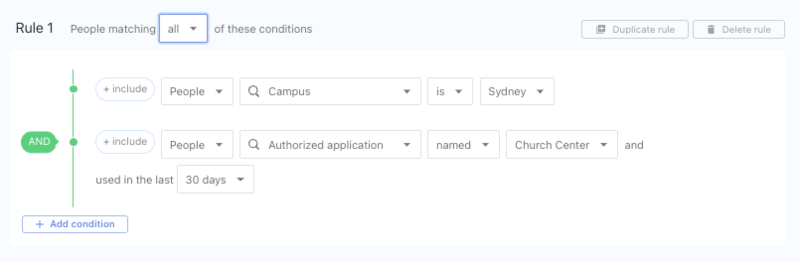
After you've communicated the campus change to your congregation, prepare them to interact with your church differently on Church Center. Create a list of people who have used Church Center in the last 30 days and send them a message about what to do now that the campus is closing.
 |
Providing next steps is very important because when the campus is deleted, anyone who's logged into the campus will be logged out instantly, and campus-specific links you've shared will revert to the main page instead of the campus page.
Prepare each product
Before you completely delete the campus from Planning Center, review each section below to ensure your account is ready.
If you have campus tags set up, create a non-campus tag for the deleted campus, and then use the bulk edit tool to swap these tags on associated events.
Similarly, if you have multiple calendars set up for each campus, use the bulk edit tool to reassign events from the campus you will delete to a new calendar.
Once the campus is removed, any events using the campus as the event location will no longer have a location associated with them.
Update or delete any campus-specific station and templates.
Close event locations and archive events specific to the campus you will delete.
Warning
Do not delete locations that have any previous check-in data, or you will lose all history.
If you'd like to maintain the ability to filter donations made at the removed campus, create a label for the campus and apply it to those donations accordingly.
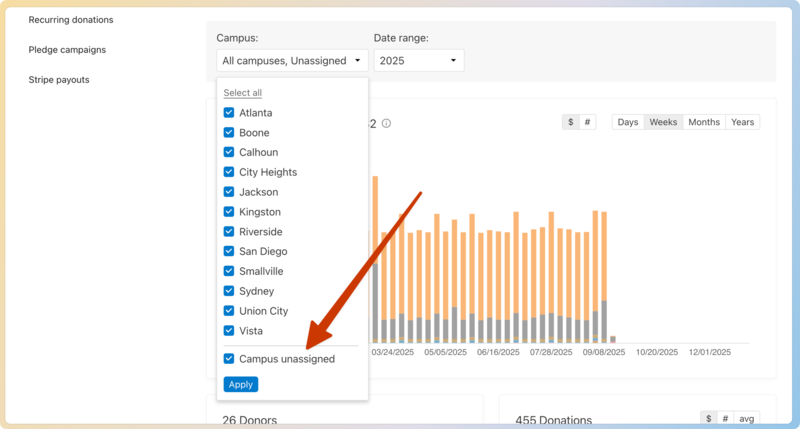
Once the campus is removed, campus stamps will be deleted from donations, and they will be moved to "Campus unassigned" in the campus filter on the Dashboard.
 |
Update any campus-related tags, group settings, or group types if you've used them to organize your groups.
In People, make adjustments to lists, workflows, forms, and profiles before removing a campus.
Lists, workflows, and forms
Filter your lists, workflows, and forms by campus. Delete lists, archive forms to keep the data, and make a new category for workflows.
When the campus is deleted:
Automations that assign profiles to that campus will be deleted.
Lists using the campus as a condition in their rules will stop running completely. Those lists cannot be refreshed until one of the list's managers removes the campus condition.
Tip
Automations on those lists will be paused when the rules are edited. Un-pause the automation after the rules are fixed, and they will run the next time the list is refreshed.
Any form submission with that campus as an answer will show as [Deleted campus] instead.
If a form has a conditional field based on that specific campus selection, the condition settings will be changed to "is answered".
Profiles
Profiles previously assigned to the removed campus will be changed to Not set or Unassigned in the campus field.
In order to retain the previous campus information, use a custom field.
Create a custom field called "Past Campus" with the old campus as one of the options.
Create a list to find everyone currently assigned to that campus.
Perform a bulk action in the list results to update the new "Past Campus" custom field for those profiles.
Archive campus-specific pages and update your home page if you manually added campus information to it.
Adjust signups to change the location, campus, and category on the About tab.
If you are using categories to organize signups by campus on Church Center, remove the category for the campus you will delete.
If you've set up folders by campus, take the following actions before removing the campus:
Archive each service type in the folder, and then delete the campus folder.
If you want to use the service types in the future, rename the service type with the campus name and move them out of the folder. Then you can archive them.
Delete a campus
After you have prepared each product, you can delete the campus.
Select the Organization page in the top navigation in account settings.
Select Church Campuses on the left.
Select the ✏️ edit icon next to the campus you'd like to delete.
Select Delete... in the bottom left.
Read through all the warnings, then select Delete this campus to remove the campus permanently.