Forms overview
Forms are used to collect information without requiring people to register for an event. Use forms to gather the necessary information, saving time on data entry and follow-up.
The Forms page is where you can:
Create a new form.
Search for a specific form.
Filter forms by campus, category, status, and more.
Review submissions that have been marked as spam.
Organization administrators can select the Unmanaged option at the top of the page to view any forms without a manager and assign themselves to them.
Use the checkboxes on the left side of the list to change access to, archive, or delete multiple forms at once.
Want to watch a video before you get started? This 12-minute video demonstrates the concepts in this article in action.
Tip
For events like VBS or children's ministry activities, start with a signup in Registrations first.
Once a signup is created, add an attendee form to collect additional profile information from parents about their children.
Create a new form
Choose the Forms page from the top navigation.
Select New form in the top right corner.
Add a title for the form and an optional short description.
Add fields to the form by dragging them from the Add a field sidebar on the right and dropping them into the body of the form on the left. There are three types of fields available:
Profile fields update a person's profile with the information they submit. The updates are automatically applied if they're logged in to Church Center when they submit the form. If they're not logged in, they'll receive an email to verify any new information before their profile is updated.
Workflow fields allow you to add someone to a workflow based on their response by linking the answers in that field to a workflow. A workflow is only an option if it has at least one step.
Workflow cards created from a form's workflow field link to the related form submission.
Workflow cards created by an automation do not have a link to the form submission.
A [Hidden workflow] option in the Select a workflow... dropdown means that you don't have access to that workflow. Workflows are only visible to their creator by default, but the creator can grant you access by adding you as a collaborator.
Basic fields allow you to ask questions that won't be added to a person's profile but can be accessed in the form's Submissions tab. Files will be available for 180 days.
Important
First name, last name, and email address are always collected by a form. These fields cannot be removed.
Select a field to add a condition, mark the field as required, or remove it from the form.
Hover over a field to duplicate it or drag it into a different position in the form.
Once you're finished making adjustments, select the View on Church Center button in the top right to see what your new form looks like in Church Center.
Warning
Email addresses cannot be updated with a form. If an email address is entered and doesn't match a profile's current email address, a duplicate profile will be created.
Conditional fields
Conditional fields allow you to only present certain fields if another field is answered or answered with a specific response. For example, you may only want to ask for Grade information if the School field is answered.
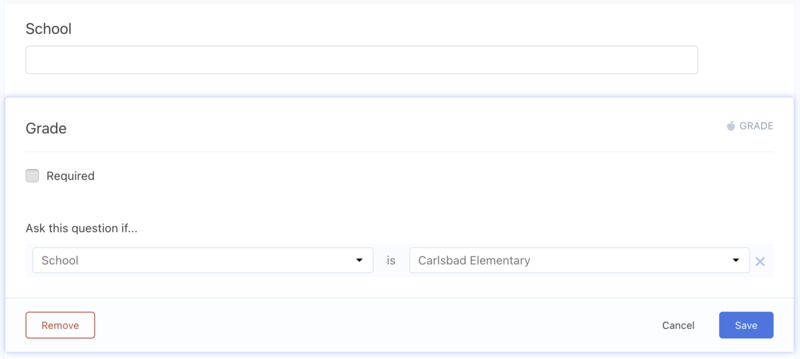
Select a field to which you'd like to add a condition, which in the example above is the Grade field.
Choose the Add condition button.
Select the connected field from the Ask this question if... dropdown, which in this example is the School field.
Choose answered or a specific response from the following dropdown. In this example, there are multiple options of specific schools to choose from.
To finish, select the Save button.
The conditional field will only appear once the connected field has been answered.
Automations
Automations give you the power to automatically update people who fill out your form. You can email them, add them to a team, event, or group, or even send them a mobile pass when they submit their form.
Duplicate a form
Duplicate a form to create a new form with the same fields and settings as an existing form. Duplicate forms are helpful if you have a form that should be filled out annually, such as a media release or information update form.
Choose the Forms page from the top navigation.
Select the Actions button to the right of the form you want to duplicate.
Choose Duplicate from the dropdown.
Select Yes, duplicate form in the popup.
Form submissions and automations will not be included in the duplicate form.
Archive a form
Archived forms are always available to unarchive and can be found using the Archived view on the left of the Forms page. Follow the steps below to archive a form.
Choose the Forms page from the top navigation.
Select the Actions button to the right of the form you want to archive.
Choose Archive form from the dropdown.
Select Archive in the popup.
Once archived, the form is no longer publicly accessible and is moved to the archive.
Delete a form
Deleted forms are available for 30 days before being permanently deleted. During this time, they can be found using the Recently deleted forms view on the Forms page. Follow the steps below to delete a form.
Choose the Forms page from the top navigation.
Select the Actions dropdown to the right of the form you want to delete.
Choose Delete from the dropdown.
In the popup, select Delete. If you're unsure about deleting the form, choose the Archive button instead.