Organize events with tags
Tags help you organize events based on a common purpose, such as campus or department. Set up tag groups based on that common purpose, and then assign those tags to your event. You can use the tags as filters on the administrator Calendar page and the Church Center Calendar page.
Important
Only organization administrators and Calendar administrators can create and edit tags.
Create a tag group
Tag groups hold similar tags in the same area. To create a new tag group:
Select the Events page from the top navigation in Calendar.
Select the ⚙️ settings icon in the top right.
Select Tags from the left sidebar.
Select New tag group in the top right.
Enter the name of the tag group.
(Optional) Select Required to require at least one tag from this tag group to be used for every event. Required tag groups are denoted by a red asterisk next to their name.
Select Save.
Edit a tag group
Select the Events page from the top navigation in Calendar.
Select the ⚙️ settings icon in the top right.
Select Tags from the left sidebar.
Select the ✏️ edit icon at the top right of the tag group.
Change the tag group name and/or the Required setting.
Select Save to apply changes.
Delete a tag group
You can delete a tag group if you no longer need it.
Warning
If you remove the tag group, all tags in that group will be permanently deleted from all events. This cannot be undone.
Select the Events page from the top navigation in Calendar.
Select the ⚙️ settings icon in the top right.
Select Tags from the left sidebar.
Select the ✏️ edit icon at the top right of the tag group.
Select the Delete button.
Select Yes, delete tag group.
Create a tag
You can add tags to tag groups if they correspond to one another. You can also add them to the Individual Tags section if you have a tag that doesn't fit with other tags. The method for adding a tag is the same wherever you add it.
Select the Events page from the top navigation in Calendar.
Select the ⚙️ settings icon in the top right.
Select Tags from the left sidebar.
Select the Create a new tag field in the group where you want to add the tag.
Enter the name of the new tag.
Choose a color to represent the tag.
(Optional) Check the Church Center category box to allow people to filter by this tag on Church Center.
Select Save to create the tag.
Assign tags to events
You can add a tag to the event when creating it or editing the event page. Required tags are shown with an asterisk and must be added when the event is created.
Tip
More than one tag from a group can be added to an event.
After assigning tags to your events, you can filter by tags to view all events with or without those tags.
Assign tags to a new event
Select the Events page from the top navigation in Calendar.
If you're a room/resource editor: Select New in the top right, then choose Event from the dropdown.
If you're not a room/resource editor: Select New event in the top right.
Enter your event details.
Select any required tags in the Tags section.
Select the Add a tag button.
Select a tag group from the dropdown or type the tag's name. Tag options auto-populate.
Select Create to finish creating your event.
Assign tags to an existing event
Select the Events page from the top navigation in Calendar.
Open the event you'd like to edit:
In month/week view: Choose an event from the calendar, then select View event to open it.
In table view: Choose an event from the list to open it.
Select Add a tag from the tag section at the top.
Select a tag group from the dropdown or start typing a tag's name to auto-populate a list of options.
Display tag dots
In the month view, you can preview your events' tags by displaying color-coded dots next to each event's name.
Select the Events page from the top navigation in Calendar.
If you're currently in table view, switch to month view:
Select View settings in the top right of the calendar.
Choose Month from the dropdown.
Select View settings in the top right of the calendar.
Scroll to the bottom of the dropdown and select Tag dots.
Manage Church Center categories
In Church Center, people can filter events by category or campus to find events that interest them.
To view which tags can be used to filter in Church Center:
Select the Events page from the top navigation in Calendar.
Select the ⚙️ settings icon in the top right.
Select Tags from the left sidebar.
Review the tags in the Church Center filters section at the top of the page.
To make an existing tag a Church Center filter, find the tag in its corresponding group and select the Church Center icon next to it.
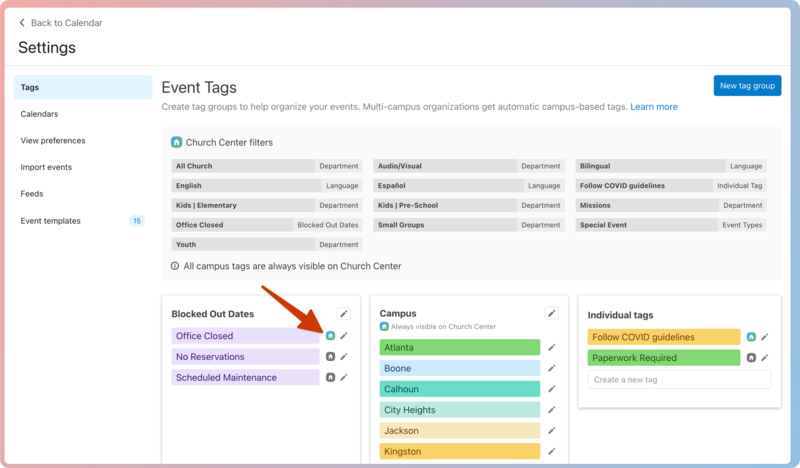
The tag is enabled as a filter when the icon appears in green.
A gray icon indicates that the tag is not currently a Church Center category.