Manage event details
Open a specific event to edit its schedule, rooms, resources, files, and tasks, and track activity associated with the event. To open a specific event and manage its details:
Select the Events page in the top navigation.
Find the event you want to open, then take one of the following actions, depending on your view settings:
In month view: Select the event name from the calendar, then select View event to open it.
In table view: Select the event name from the list to open it.
On the specific event page, you can do the following:
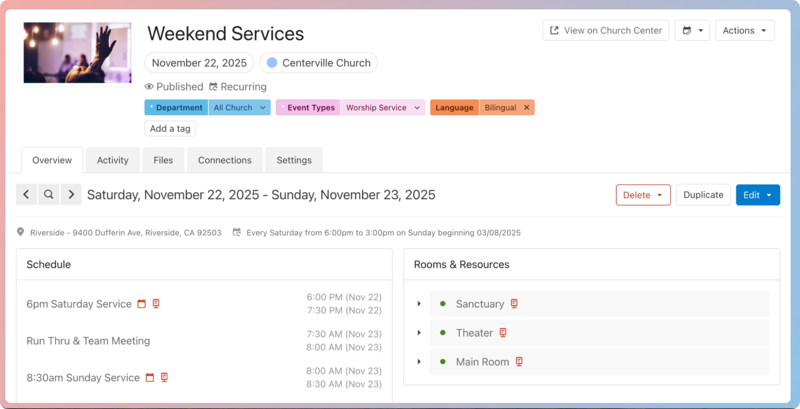
Review the event's basic details in the header. The status below the event name indicates which calendar it belongs to, its visibility status in Church Center, and whether it is a recurring event. Everything in the event header (besides the name) applies to the event as a whole, including past and future instances.
Use the Actions button in the top right to edit the event title, create an iCal feed, embed, or kiosk to share this event, run a report for this event, or delete every instance of this event.
Add tags using the Add a tag button.
Select one of the tabs to manage specific details. Check out the sections below to learn more about what details you can manage on each tab!
Want to watch a video before you get started? No problem! This seven-minute video will demonstrate the steps in this article in action.
Overview
The Overview tab shows information about the specific instance of the event you're viewing. Edits made on the Overview tab can be applied to this instance only or all future event instances.
If your event is recurring, use the navigation arrows next to the date to move between instances or select the 🔍 search icon to skip to a specific date.
Use the Delete button in the top right to delete this date or this and future dates.
Use the Duplicate button to create a duplicate event with the same settings and booking requests.
Use the Edit button to edit event details, such as the schedule and sharing settings, recurrence pattern, location, tasks, and rooms & resources for this date or this and future dates.
Important
The calendar and kiosk icons in the Schedule section only affect whether information is displayed on shared iCal feeds, embeds, and kiosks.
You must manage Church Center visibility on the Settings tab.
If you are an approver, you can select the Review approvals button in the top right to go to the Approvals tab on the Events page.
Activity
Keep track of event changes and collaborators on the Activity tab.
How to filter activity
Use the filter options in the left sidebar to see specific types of activity:
Bookings include all activities around the requested rooms and resources.
Comments show all internal and emailed comments.
Conflicts are noted when conflicts are created and resolved.
Requests denote when a requested event is approved.
Schedule shows any changes made to the event time and date, schedule, and repeating pattern.
Settings include any changes made to the event's overall settings, including added files, location, tags, and all features managed on the Settings tab.
View comments and enable email notifications
In the Activity tab, people with Calendar access can leave internal comments about the event for other admins to see. To receive email updates for those comments, select the Subscribe button in the top right and toggle the Enable email notifications option in the popup.
Event request form emails
Events created through an event request form include a Send email option in addition to the Internal notes tab. This is for communicating with event requesters who don't have Calendar access.
The content of emails that are sent to the requester from the Activity tab is shown in the activity feed and highlighted in blue. When the event requester responds to the email, it will appear in the event activity feed, highlighted in yellow.
Files
The Files tab allows you to add any attachments needed to run the event. Files added to an event are not visible to the public when the event is published.
Add files using the Add file button in the top right.
To view an existing file, select the file name in the list.
To edit or delete a file, select Edit to the right of the file.
If this event was requested using an event request form, you can review the original form submission details by selecting View next to the form name in the Form Submission section.
Connections
In the Connections tab, connect Calendar events to events in other Planning Center products. Events from other products appear as widgets and provide an at-a-glance overview of your event's information in connected products.
Select the New connection button in the top right corner to add a connection to another product.
Select the ⚙️ settings icon in a widget to remove the connection or open the event in the connected product.
Settings
In the Settings tab, you can make changes to the event as a whole. These settings and the tags in the header apply to all instances of recurring events.
Update your event's basic settings in the top section:
Event calendar: If you have multiple calendars in your organization, use the dropdown to adjust which calendar this event belongs to.
Event owner: Select event owners and managers to allow them to make changes to the event. Event owners receive all communication about this event.
Event managers: Enter someone's name in the search field to add them as an event manager. Event managers can edit the event's details and subscribe to the event's activity feed.
Registration URL: If people need to register for this event, connect it to a signup in the Registration URL section. Choose an existing Registrations signup event from the dropdown, create a new signup in Registrations, or enter the URL for signups hosted through another site.
Toggle the Use signup page as event page on Church Center setting to automatically redirect people to the published Church Center signup page when they select the event on your Church Center calendar.
Important
The event only redirects to the Church Center signup page if you select the event directly from the Church Center calendar page.
If you select View in Church Center from the event page in Calendar, you'll be taken to the Church Center calendar event page.
Summary: Add an event summary to display on iCal feeds and kiosks.
Notes: Add internal notes to the Notes section. These notes won't be displayed on any public-facing event page.
In the Church Center section, you can update the settings for the event's Church Center calendar page.
Event image: Upload an image to display on Church Center and iCal feeds, or select Free photos to choose a stock image.
Visibility: Set the event's Church Center visibility setting. If you keep the event unpublished, it can still appear on iCal feeds, but it will not appear on Church Center.
Description: Enter the public description for your event, which will show on the Church Center page instead of the summary in the Basic settings section.
Warning
The Delete event button in the top right erases the entire event, including past instances, and deleted events cannot be recovered.
To delete a single instance or only future instances of an event, use the Delete button on the Overview tab instead.