Edit an event
You can edit an event to reschedule it or update the location, frequency, rooms, or resources. Administrators can edit any event, while creators can only edit events they've created.
Warning
Changing an event's schedule also changes the event's Church Center URL. If you're editing an event that's published on Church Center, make sure to share the updated link.
Edit a non-recurring event
Select the Events page in the top navigation.
Open the event you'd like to edit, depending on which view your calendar is in:
In month view: Choose an event from the calendar, then select View event to open it.
In table view: Choose an event from the list to open it.
Select Edit in the top right.
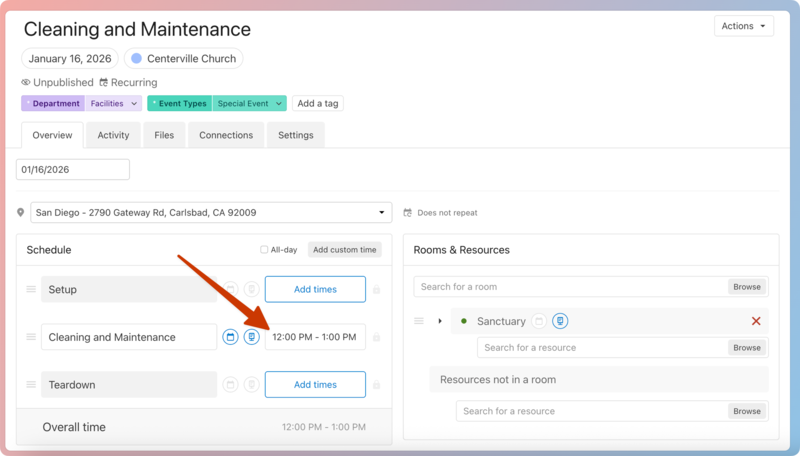
Update your event's date, location, schedule, task lists, rooms, or resources.
Important
If the event comes from a Groups or Registrations feed, you can only edit the Rooms & Resources section. Scheduling information, locations, and settings can only be updated on the original Groups or Registrations event.
Select the date field in the top left to reschedule this event for a different date.
Select the Edit recurrence button at the top to convert this event into a recurring event. Choose a frequency setting from the pop-up that appears.
Select the 🗓️ calendar icon next to a room to display it on the public Church Center page, if applicable. Only approved rooms will show on the Church Center event page.
Select Save for this date in the bottom right to apply your changes.
Edit a recurring event
You can edit either a single instance of a recurring event or all instances of a recurring event.
When editing a single instance, you can only modify the name, date, location, schedule, rooms, and resources. Changes to any details in the Activity and Settings tabs will apply to the entire recurring event series.
Select the Events page in the top navigation.
Open the event you'd like to edit, depending on which view your calendar is in:
In month view: Choose an event from the calendar, then select View event to open it.
In table view: Choose an event from the list to open it.
Select Edit in the top right.
Choose whether to apply changes to This date only or This and future dates from the dropdown.
Update your event's location, schedule, task lists, rooms, or resources.
When editing a single instance (This date), you can select the date field in the top left to reschedule that particular instance only.
When editing multiple instances (This and future dates), you can select the Edit recurrence button at the top to change the recurrence pattern for the following events in this series.
Select the 🗓️ calendar icon next to a room or resource to display it on the public Church Center page, if applicable. Only approved rooms or resources will show on the Church Center event page.
Important
If you connect a task list to this event, it applies to the entire recurring event series.
Select Save for this date or Save for this and future dates in the bottom right to apply your changes.
Rename an event
You can rename both recurring and non-recurring events! When editing a recurring event, you can choose to rename only a single instance, in case you need a different name for a special event.
Select the Events page in the top navigation.
Open the event you'd like to edit, depending on which view your calendar is in:
In month view: Choose an event from the calendar, then select View event to open it.
In table view: Choose an event from the list to open it.
Select the Actions button in the top right.
Choose Edit title from the dropdown.
Edit the event name in the text field.
Press the
returnorenterkey on your keyboard.(Optional) When editing a recurring event, choose whether to save your changes For this date only or For all dates in the popup, then select Save for [selected option].
Reschedule an all-day event
To reschedule an event that lasts all day (or spans multiple days):
Select the Events page in the top navigation.
Open the event you'd like to edit, depending on which view your calendar is in:
In month view: Choose an event from the calendar, then select View event to open it.
In table view: Choose an event from the list to open it.
Select Edit in the top right.
Deselect the All-day checkbox in the top right of the Schedule section.
Select the time field.
Set a new date range from the calendar that appears, then select Apply.
Re-select the All-day checkbox.
Select Save for this date to apply your changes.