Create and edit event request forms
If you want people without Calendar access to request events at your church, create an event request form! Use your form to collect important event details, such as the date, time, or any required rooms or resources.
Anyone with a link to the form can request an event while the form is open. Once someone submits a request, the form's approval group members are notified and can either approve or reject the request.
Events submitted through a form always require approval, even if they don't include rooms or resources, so you can consider sharing a form with your staff if you need all church events go through an approval process.
Important
Only organization administrators and event administrators can create and edit event request forms, but anyone with Calendar access can view all event request forms and submissions.
Create an event request form
Select the Forms page in the top navigation.
Select New form in the top right.
Choose the default settings for all events created with this form, including:
Form name: Add a name that describes what this form will be used for.
Event owner: Select a default event owner for events requested using this form.
Approval group: Choose which approval group is in charge of approving requests from this form. Approvers do not receive an email notification when the form is created.
Default calendar: If you have multiple calendars, choose which calendar this form's events should belong to.
Select Create form to edit your new form.
Select the text below the form name to add a description.
(Optional) Check the Allow requests for recurring events box to give requesters the option to choose a recurrence pattern for their event request.
Drag a field from the Add a Field sidebar on the right to add it to your form:
Event Fields: Choose which event templates, rooms, or resources requesters can select on the public form.
Important
You can only add an event template field OR a room and resource field to your form. Event templates and room/resource fields can't be used together.
Basic Fields: Choose how you'd like to gather specific types of information from the requester.
Enter a question and description in the corresponding fields to guide the requester.
(Optional) Check the Required box to require an answer to this field from your requester.
Select Save to finish adding the field. You can continue adding multiple fields to your form.
Drag and drop fields to your desired location to reorder them on the form.
To edit a field, select it from the form and make your changes, then select Save.
To remove a field, select it from the form and select Remove.
Now that you've created an event request form, learn how to share your form with the public so they can submit requests!
Check out the article on how to request an event in Church Center to see how requesters can fill out an event request form.
Tip
Payments are not supported in Calendar. If you'd like to charge a fee for reserving an event, you can create a hidden signup in Registrations to collect non-deductible payments for rentals and add the signup's URL to the event request form's description.
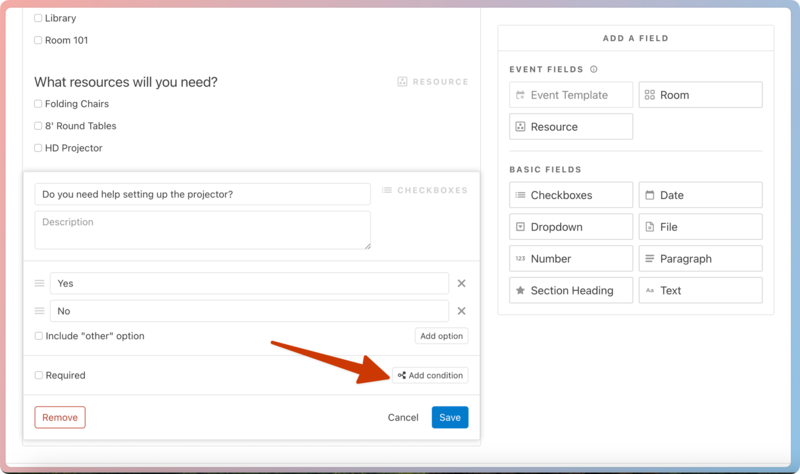
Add conditions to a question
Add conditions if any of your questions only apply to certain situations, such as gathering more information about A/V needs or food service. You can add a condition when creating or editing a field.
Select a field to which you'd like to add a condition.
Select the Add condition button.
Use the dropdowns to choose the question and answer that a requester must select to display this field.
Select Save.
Update event request form settings
Select the Forms page in the top navigation.
Select an event request form from the list to open it.
Select the Settings tab to update the form's settings:
Event owner: Choose an event owner for all events created with this form. The new owner will receive an email notification.
Event tags: Add tags to apply to events created with this form.
Default calendar: If you have multiple calendars, choose which calendar this form's events should belong to.
Custom reply email: The submitter will receive an email with the details of their submission.
Approval group: Choose which approval group should approve or reject events created with this form.
Important
Changing the approval group immediately updates pending requests for affected approval group members. New approvers will not receive email notifications for existing pending requests.
Status: Update the form's status.
Open: People can submit requests, and the pending event will show in the calendar view for the default event owner and assigned approvers.
Closed: No new requests can be submitted, but pending requests are kept intact and hidden from everyone in the calendar view. Feeds from closed forms will be hidden from the Filter pane on the Events page until they are reopened. If someone tries to use the form's link while it's closed, they'll see that it is not accepting submissions.
Archived: Archived forms are closed, and all pending event requests are rejected and deleted. You can restore an archived form from the Status section.
Sharing: Share your form on Church Center or in Groups.
Duplicate an event request form
If you need to create a form that's similar to an existing one, duplicate it!
Select the Forms page in the top navigation.
Select an event request form from the list to open it.
Select Actions in the top right.
Choose Duplicate from the dropdown.
Enter a name for the new form.
Select a default event owner for the new form.
Select an approval group for the new form.
Select Create form to finish duplicating the form.
Archive an event request form
You can archive an event request form if you no longer need it.
Important
Archiving a form rejects and permanently deletes any pending requests.
Select the Forms page in the top navigation.
Select an event request form from the list to open it.
Select Actions in the top right.
Choose Archive from the dropdown.
Select Yes, archive this form in the confirmation pop-up.
Restore an archived event request form
Select the Forms page in the top navigation.
Select Archived from the left sidebar.
Select an archived event request form from the list to open it.
Select the Settings tab.
Choose Open from the Status dropdown to restore this form.
Delete an event request form
Warning
Deleting a form rejects and deletes all associated pending event requests. Requested events that have already been approved are not affected. Deleted forms and event requests cannot be recovered.
Select the Forms page in the top navigation.
Select an event request form from the list to open it.
Select Actions in the top right.
Choose Delete from the dropdown.
Type "DELETE" in the pop-up.
Select Yes, delete form to permanently delete this form.