Approve or reject requests
Some things require approval before they can be reserved. If you're an approval group member, you can approve or reject requests for the rooms, resources, and event request forms that are assigned to your approval group.
When a room, resource, or event is requested, the request is sent to all members of the assigned approval group(s). Only one person from each approval group is required to approve or reject a request.
If you request a room or resource that's assigned to your approval group, the request is automatically approved, and other approval group members are not notified. However, if you submit a request through an event request form, the request will still need to go through the approval process, even if you're an approver.
View pending requests
When a new request requires your approval, you'll receive an email and see a yellow dot on the Approvals tab of the Events page.
To view pending requests on the Approvals tab:
Select the Events page from the top navigation in Calendar.
Select the Approvals tab to see any approval requests that require your action:
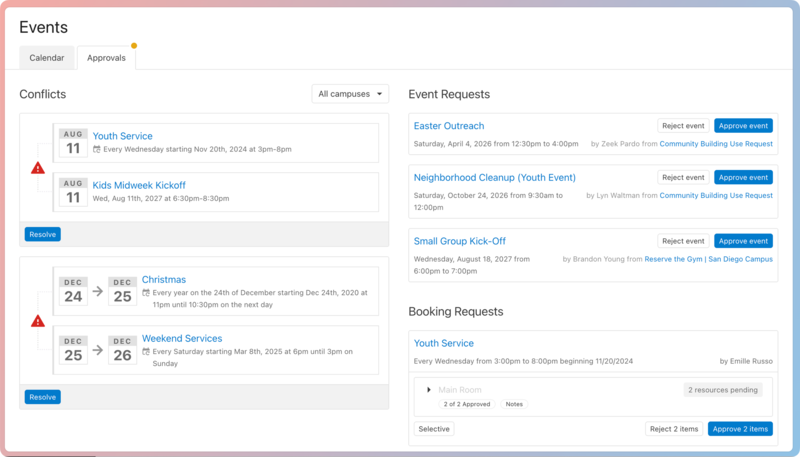
Conflicts: This section only appears if you're a conflict resolver, and there are pending conflicts to resolve. If an event has a conflict, approval notices are not sent out until it is resolved.
Event requests: This section shows pending events created through an event request form. Below the request, you'll see the approval groups your response applies to. If you're part of multiple approval groups, your single response applies to each group.
Booking requests: This section shows events with pending room or resource requests.
You can also filter the Events page by approval status to see any pending events (highlighted in yellow) or rejected events (highlighted in red).
Head to the Respond to a request section to learn how to respond to different types of requests. Once requests have been rejected or approved, they're removed from the Approvals tab. Approved events will appear on the Calendar tab.
Respond to a request
When you're ready, you can approve or reject requests from the Approvals tab on the Events page.
Room or resource requests
Select the Events page from the top navigation in Calendar.
Select the Approvals tab.
Scroll down to the Booking requests section.
Use the buttons under each pending request to choose your response or view more details:
Select the event name to view more details on the event page.
For events with one requested room or resource, select Reject or Approve for the request.
For events with multiple requested rooms or resources, select Selective to choose which items you'd like to approve or reject. You can also select Reject [number] items or Approve [number] items to apply the same response to all requests.
Event request form submissions
To respond to event request form submissions:
Select the Events page from the top navigation in Calendar.
Select the Approvals tab.
Use the buttons under each pending request in the Event Requests section:
If rooms and resources haven't been requested for the pending event, you can select Reject event or Approve event to respond to the request.
If rooms and resources have been requested for the pending event, you must select View event request to apply the requested rooms and resources to the event before it can be approved. This allows you to make changes to rooms or resources before sending requests to the corresponding approval groups.
You can also select Reject event if you know the event can't happen at this time.
If you selected View event request, select Apply & Edit in the bottom right of the Requested Rooms and Resources section.
(Optional) Edit the requested rooms and resources or answer any required questions.
Select Save in the bottom right.
Select Yes, make these changes in the confirmation popup. This sends a request to the corresponding room and resource approval groups.
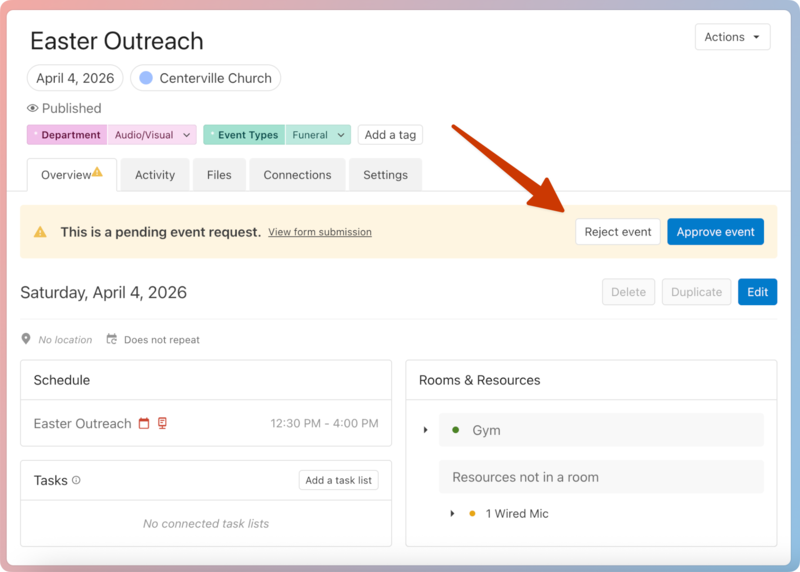
Select Approve or Reject from the banner at the top of the event. Your decision only applies to the approval group(s) you're a part of.
Important
If multiple approval groups are assigned to the event request form, the event remains pending until all approval groups have responded.
If any assigned approval group rejects the event, the entire event is automatically rejected and must be resubmitted.
When you give final approval or rejection for an event request, the requester is notified of the decision by email. You can choose to include a custom message with the decision notification.
If you are responding to a Groups event request, email your approval and other comments to the requester, since they may not have access to Calendar.
Tip
If you only need to reject specific instances of a recurring event (e.g., every Thursday except the 16th), you can approve the event anyway and delete those specific instances afterward. Make sure to communicate those changes to the event requester using the Activity tab.
Ask for more information
If a room isn't available for the requested time or you need more information before responding to a request, ask for more details in the event's Activity tab.
Select the Events page from the top navigation in Calendar.
Select the Approvals tab.
Select an event name from the list of pending requests to open the corresponding event page.
Select the Activity tab.
Add a comment to the activity feed:
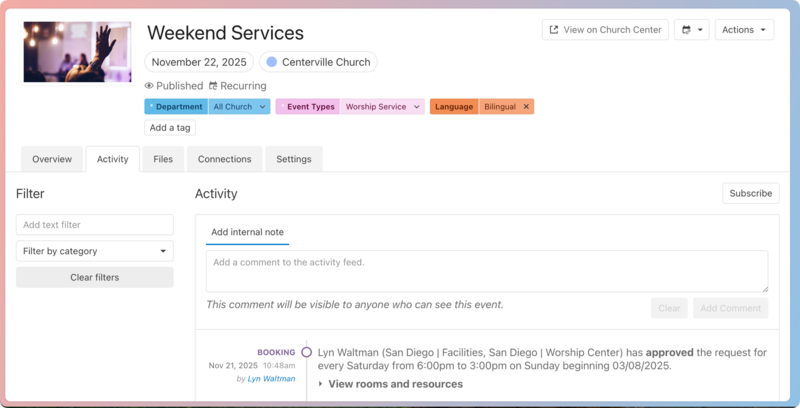
Select Add internal comment to communicate with the event owner, managers, and approval group members in Calendar. The event owner, managers, and subscribers can respond with internal notes. You can edit your internal notes at any time.
If the request was made through an event request form, select Send email to communicate with requesters who don't have Calendar access. Your comment and the requester's email responses will be visible to anyone who can see the event in Calendar.
Select Add Comment or Send Email to finish sending your message.
The event owner and other approvers in the form's default approval group are CC'd on all emails between the event and the requester. Event subscribers are not CC'd on requester emails, but can view all emailed comments in the Activity tab.
What happens when a room or resource is approved or rejected?
Approved: The event owner and manager are notified when a room or resource is approved. Once all rooms or resources are approved, the event is removed from the form's feed, added to the Calendar feed, and included on shared iCal feeds, kiosks, and embeds.
If an event with a previously approved room or resource is rescheduled, that item reverts to a pending state, and the assigned approval groups are notified via email and the Approvals tab.
Rejected: The event is also declined, and the owner and manager are notified. The event is highlighted in red in the month view, but can still be added to Church Center if desired. For the event to happen, the owner or manager can remove the declined room or resource and add another room or resource (if needed).
If you reject an event request form submission, the pending event is deleted immediately and cannot be recovered. The requester must resubmit their request.
Warning
Once you approve or reject a request, it cannot be reversed.
If you select the wrong button and need to change your response for a booking request (requested room or resource), you must remove the room or resource from the event, add it back, and then take the correct action.
What happens if I don't approve or reject a request in time?
If an event request is neglected until the requested date passes, the request disappears from the Approvals tab but remains active and accessible in the Requests tab of the form. If the requested date is moved to a date in the future, the approval request reappears on the Approvals tab for the approvers.