Introduction for schedulers
The main responsibility of a scheduler is to manage teams. This includes assigning team members to positions within teams, communicating with team members to get their preferences, and then scheduling team members to plans. Services streamlines these tasks to help you set up the information and let the system work for you!
Tip
If you cannot log in, follow the steps in the Log in to Planning Center article.
View your teams
Whether you're creating a team from scratch or managing an existing one, you'll manage your team members from the team page.
To go to your team page:
Select the People page from the top navigation in Services.
Select the Teams tab to view all of your organization's teams.
Use the dropdown in the top left to filter the list by My Teams (teams where you're a leader or member), All Teams, Archived Teams, or specific service types.
You can also search for a specific team by name using the search bar.
Select a team name to open that team's member list.
You can find the following information on your team page:
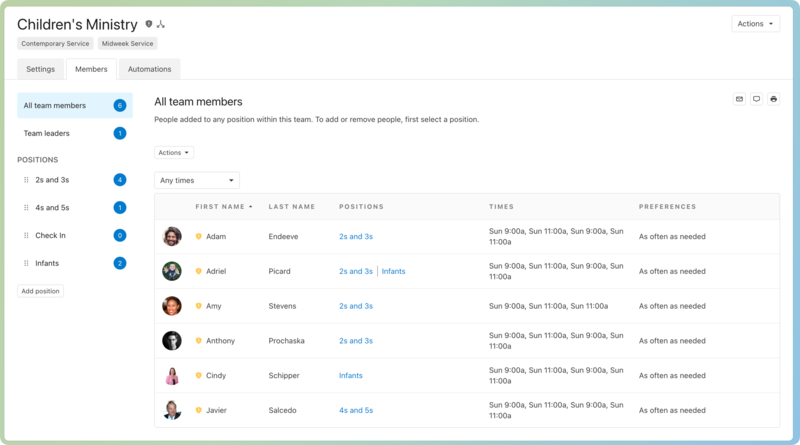
The header gives you insight into your team: its name, its assigned service types, and its team type.
Go to the Settings tab to update the type, scheduling defaults, service types, and options for what team members see.
Go to the Members tab to view all of your team members and their positions.
Select Team leaders from the left sidebar to manage this team's leaders and their notification settings. The person who created the team is the default team leader.
Select a position from the left sidebar to manage which team members are assigned to that position, or select Add position to create a new one.
Use the Times and Preferences columns to manage your team members' scheduling preferences for them.
Communicate with team members
As a scheduler, you can only communicate with the teams you lead. There are multiple places you can email your team members:
Send general information to the whole team from the People page or Teams Page.
Email a specific person from their profile.
Communicate with those scheduled to a specific plan.
Regardless of how you communicate to them, make sure you remind them about setting their preferences and blocking out dates. When they do that, you can have a more predictable schedule.
Schedule people
When your teams and positions are set up, it's time to schedule people to your plan!
Select the Plans page in the top navigation.
If you have multiple folders, select the folder that contains the service type you're working with.
Select a plan from the service type you're working with.
Select the Teams tab.
Select the Team Actions button in the top right.
Choose one of the first four options from the dropdown, depending on how you want to schedule:
Add People: Browse all team members, schedule everyone on a team, or schedule a guest.
Import Template: If your team members serve on a rotation templates are for you! Create a template with your team members assigned to their specific positions, and then import it into your plan!
Needed Positions: Not totally sure who you want to schedule, but you know how many people you want in each position? Start with adding those numbers as needed positions.
Auto-Schedule: If you use needed positions, and your team members have put all their preferences in, let the Auto-Scheduler do the work for you! It will look at the number of positions you need as well as those preferences, and then schedule accordingly.
The matrix
Once you've gotten the hang of scheduling one plan at a time, try scheduling multiple weeks at a time by setting up a custom matrix.
When you use the matrix, you can send your team one email with all of their requests for a time frame, which cuts down on the amount of emails your team members receive.
Want to watch a video before you get started? No problem! This seven-minute video covers how to schedule from the matrix.
Get help and support
Any time you have questions, Planning Center's support team is here to help! Use the ? question mark icon in the toolbar to open the Help and support sidebar.
From here you can:
Search online documentation for an instant answer to your question. The toolbar also suggests help articles based on the page you are currently viewing.
Access getting started resources or jump into Planning Center University (PCU). You can also connect with other Planning Center customers in the customer communities and see what's new by checking out the changelog.
Connect with a support agent for one-on-one help. You can email them directly from the toolbar, or schedule a phone call if you prefer.
Depending on which Planning Center product you're using, you can also contact support directly from the corresponding mobile app:
Services/People: Tap your profile icon in the top right, then tap Help to access help articles or open a ticket with support.
Check-Ins: Tap the ⚙️ settings icon in the bottom right, then tap Contact Support to open a ticket with support.
Music Stand: Tap the menu icon (three horizontal lines) in the top left, then tap Help to access help articles or open a ticket with support.
Organization administrator requests
The following Support requests can only be made by organization administrators:
Data removal or corrections you can't make yourself (undo old CSV imports, iCal imports, etc)
Gain access to anything that was created and managed by someone else in the account
Restore or fully delete a canceled account
Request access to Giving (if there are currently no Giving administrators in the account)