Collect payments in Registrations
When collecting registrations, some signups have an associated cost. You can manage these payments using selections or add-ons.
Warning
Registrations is for tracking non-tax-deductible payments only. Payments made through Registrations will not be visible in Giving. If you need to collect a donation along with the cost of a signup, the donation will need to be done as a separate transaction from your donation form.
All online payments incur a processing fee according to the current rate.
Set the price of your event
There are two ways to set a price, depending on what you collect money for.
Use selection types if there is a general cost to attend.
Use add-ons for additional expenses associated with the event.
If your event has an admission fee, you can add the cost by creating a selection type and setting the price.
If the price is left at $0, the selection type will be listed as Free on Church Center.
Use partial payments to require a deposit or allow people to register without making an online payment. When registering, people who pay a portion of their total cost can pay their balance later online or in person.
If your event has additional expenses, such as t-shirts and meals, you can manage them using add-ons to set the price and list available quantities.
Important
Add-ons are only available for signups with named attendees.
Add the price per add-on. If a registrant selects multiple, they'll be charged this price for each add-on they choose.
Set a quantity if there is a limited amount of the add-on. When registering, attendees will see the number remaining. When the limit is reached, the add-on will show as Sold Out.
Use partial payments to allow people to pay for only part of the add-on while registering. Set a minimum deposit required, if necessary.
Allow attendees to purchase more than one add-on by checking the Allow attendees to purchase more than one box. Leave the box unchecked to limit attendees to only one add-on.
Manage payment methods
Payments can be made online using credit/debit cards and bank account payments, or cash and checks applied by an administrator or manager. Credit and debit card payments are enabled automatically when a signup is created. Bank account and cash or check payments can be enabled by a signup contributor.
Tip
Individuals with Apple Pay and Google Pay enabled on their devices can use these payment methods to make payments. Please note that while Google Pay can be used in Registrations, it cannot be used in the Church Center app.
You can adjust acceptable payment methods from the Settings tab of your signup.
Select Signups in the top navigation.
Choose the signup to edit from the list.
Select the Configuration tab.
Select Settings on the left.
Select Edit in the Payments box.
Turn on the Online Payments toggle to allow credit and debit card payments or turn it off to disable online payments.
(Optional) Check the Allow bank account payments to allow attendees to pay with their bank accounts.
Important
Attendees will only have the option to pay with a bank account if it was added as a saved payment method before they register.
Turn on the Cash or Check toggle to allow attendees to turn in physical payments, instead of paying during the registration process online.
Important
If cash/check payments are enabled for a signup and a minimum deposit is required, attendees can complete their signup without paying a minimum deposit by choosing the cash/check option. You can prevent this by only allowing online payments. Deposits received via cash or check can be applied to registrations by administrators after they are received.
Select Save to update the signup's payment methods.
Reports and bookkeeping
After receiving payments for your signups, the money will be deposited into your connected bank account in groups called payouts. Use the payment information in Registrations and the payout reports in Account settings to help reconcile the deposits with your bank account.
Payment information
You can see payments from all signups on the Payments page or for specific events by going to the Payments tab within a signup.
Payment page
The Payments page shows all payments received from all signups within a filtered time frame.
From the Payments page, you can:
Filter transactions by date, payment method, and transaction type using the filters at the top of the table.
Export transactions by selecting Export CSV. Depending on the amount of information in the CSV file, it may take a few minutes to download.
Issue a refund or resend a receipt via email by selecting a transaction to view its details.
Payments tab
The Payments tab within a signup provides a list of payments received from that signup.
From the Payments tab, you can:
Issue a refund or resend a receipt via email by selecting a transaction to view its details.
See a breakdown of the total expected money for the signup, including amounts collected, refunded, received, and unpaid, in the top-right corner.
Export transactions by selecting Export CSV. Depending on the amount of information in the CSV file, it may take a few minutes to download.
Payout reports
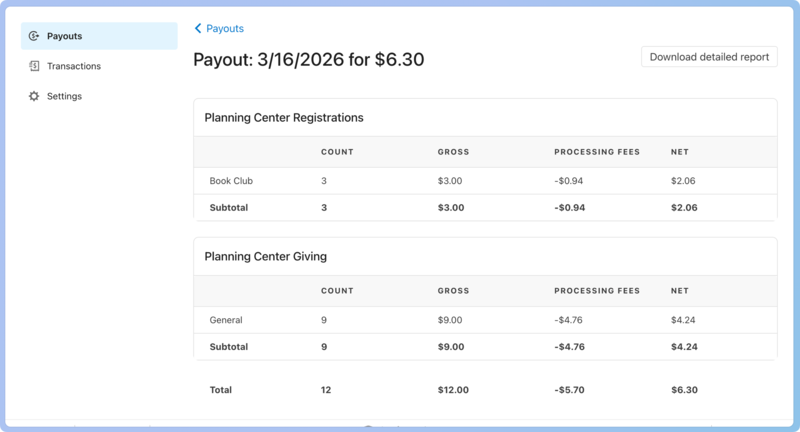
Organization administrators and billing managers can see a breakdown of the payouts received by selecting View payouts in the top right corner of the Payments page in Registrations.
In these payout reports, located on the Payments page in Account settings, the deposit is broken up by Giving fund and Registrations signup. The Registrations section shows how much was brought in by each event.
Check out the View and reconcile payouts article for more detailed information on managing deposits.
 |
Other supported currencies in Registrations
Registrations also supports the following currencies to collect payments through signups. Contact the Planning Center support team to have these currencies added to your account.
The Euro (EUR)
Great British Pound (GBP)
Japanese Yen (JPN)
South African Rand (ZAR)
Additional resources
Check out these additional resources to help manage payments, send balance reminder emails, issue refunds, and more.