Resolve conflicts
Assign specific people in your Calendar account as conflict resolvers so they can manage any scheduling conflicts that may arise for your rooms and resources.
For example, if there's a Bible study every Monday afternoon that uses the fellowship hall, but a wedding would like to use that room, conflict resolvers can see if the Bible study is willing to move for that day.
Assign a conflict resolver
You can assign anyone with administrator permissions as a conflict resolver. Conflict resolvers can view all of the conflicts in your organization, so only a few people in your account should be assigned to this role.
Select the People page in the top navigation.
Select a person from the list or search for their name to open their profile.
Select the Actions button in the top right of their profile.
Choose Manage permissions from the dropdown.
Check the Conflict Resolver box in the popup.
Select Update to apply your changes.
Create the conflict
When you request a room or resource that's already been reserved, you'll see a ⚠️ warning icon next to the title. If you still want to request this room or resource, you can keep it on your event, which will create a conflict.
When a conflict is created, the approvals for the conflicting rooms and/or resources will be set back to pending. Once the conflict is resolved, approval notifications will be sent out for both events.
Warning
You cannot resolve a conflict with a blockout. Blockouts automatically win conflicts, so there's no way to request a room or resource that has been blocked out for a particular date and time.
Any conflicting bookings that overlap with a newly created blockout are automatically rejected, and the affected event owners are notified by email.
Resolve the conflict
A conflict resolver will receive an email notifying them of the conflict 30 minutes after it was created. The time delay allows event owners and managers to make changes to the event, so all requests go out at once.
If you're a conflict resolver, manage conflicts on the Approvals tab:
Select the Events page in the top navigation.
Select the Approvals tab.
(Optional) If you have multiple campuses, use the dropdown at the top to choose which campus's events to view.
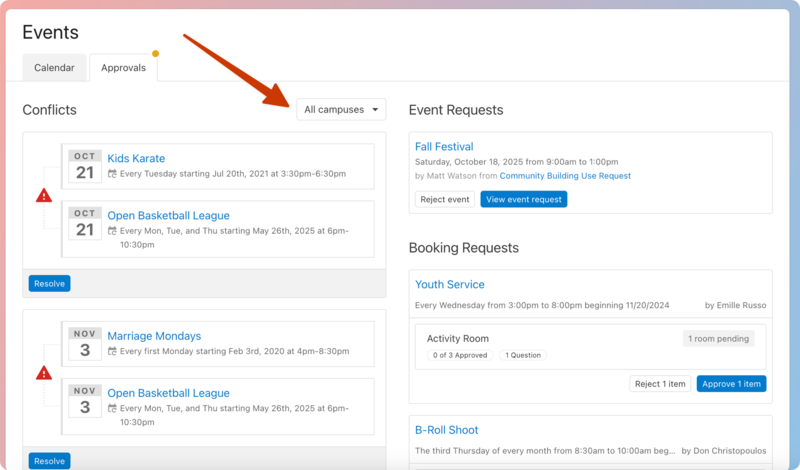
Select Resolve below a conflict to see more details about the conflict and choose how to resolve it.
Review the requested room/resource and the conflicting times on the right side of the popup.
Select which event should get the room or resource, or select Share this [room or resource] if both events can use it.
Add a reason to send to the rejected event owner. If you choose to share the room/resource, the reason will be sent to both event owners.
Select Resolve conflicts to finish resolving the conflict.
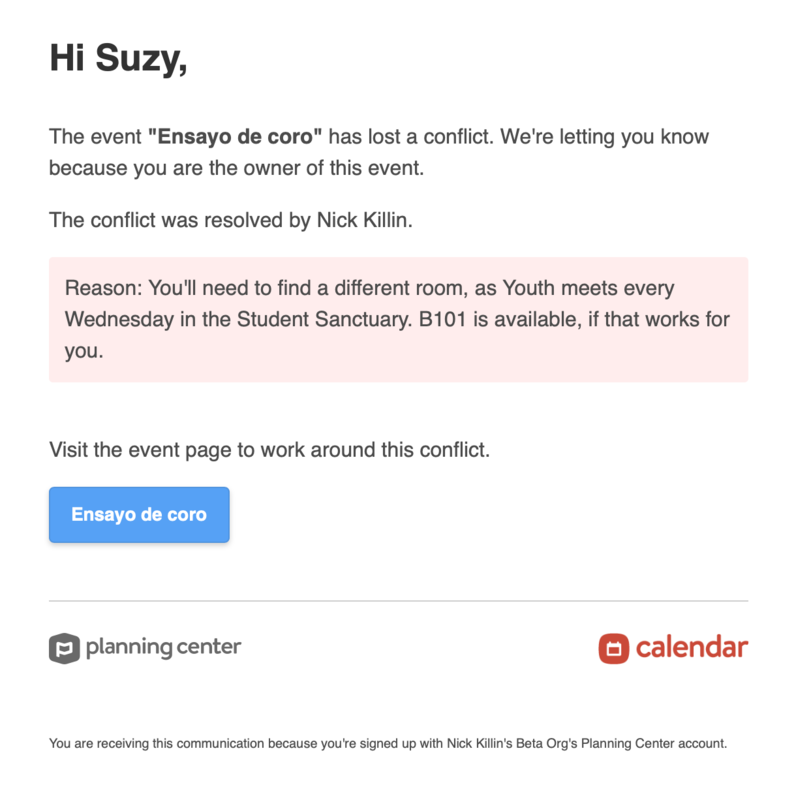
After the resolution
After the resolution, emails will be sent to the corresponding event owners and managers with the reason you listed.
If you choose to share the room or resource, each event will have a blue banner notifying you of the shared room or resource.
Change a conflict resolution
If you resolve the conflict one way and want to resolve it differently, follow these steps:
Remove the room/resource from one of the two events.
Add the room/resource back to the event, which will create a conflict.
Resolve the conflict in a new way.
Since the event owners will receive emails about the resolution, you must manually send a follow-up email to the event owner with the originally approved conflict details.