Filter events
Use filters to narrow your events by specific categories. After applying filters, you can share them or run a report that only includes the filtered events.
Important
Any filters you select are saved to your browser, so they'll be automatically applied the next time you open the Events page.
Filter events
Select the Events page from the top navigation in Calendar.
Select Filter in the top left to expand the filter menu.
Use the checkboxes and dropdowns in each section to apply filters for each category:
Calendars: If you have multiple calendars in your organization, use the checkboxes to choose which calendars' events to include in your view.
Groups/Registrations: If you've set up Groups or Registrations feeds, you can choose whether to include feed events in your view.
Select the arrow next to Groups to expand the list of group types. Use the checkboxes to choose which group types' feed events to display.
Hover over the Groups or Registrations icons and deselect the checkbox that appears to exclude feed events from your view.
Event type: Choose whether to show all events, only regular events, or only blockouts in your view.
Event Requests: The Event Requests feed lets you see pending event requests in the calendar before they are approved. These filters are enabled for assigned default event owners and approvers. They are disabled by default for everyone else.
My events: Apply the My events filter to view events where you've been assigned as an event owner, manager, or approver. Choose Subscriber to view events where you've subscribed to the Activity feed.
Approval status: Filter events based on their approval status. To ensure all upcoming events have been approved, filter for Pending events to quickly approve or decline resources if you're in the appropriate approval group.
Tip
Check out the Customize the calendar view article to learn how approval statuses are color-coded in the month view.
Event owners: Filter events based on the event owner. This can be helpful if you're bulk editing owners for multiple events.
Church Center: Filter events based on their Church Center visibility.
Connections: If you've connected events to other Planning Center products, you can filter events based on the product to which they're connected.
Rooms & Resources: Filter events that have requested specific rooms or resources. Start typing the room or resource into the search field, and then choose the corresponding option from the dropdown. If you filter by a folder, the calendar filters to events that use any items within the folder.
Tags: Filter events by tags. Select one or more tags from the list to add them as filter options.
When the view setting is set to Active tags, only tags which have been assigned to events will appear. Select All tags from the dropdown to view all of the tags in your account.
Important
If you don't see any tags when Active tags is selected, it means none of your events have tags assigned to them. Assign tags to the events, and try the filter again.
Filter logic
Filters work differently depending on whether you're selecting multiple tags from the same tag group or different tag groups. Understanding filter logic helps you apply advanced filters more effectively.
Same Tag Group = OR. When you select tag filters from the same tag group, you can imagine that those options are joined with the word 'OR.' This pulls up events that include any combination of the selected tags from that tag group.
Different Tag Groups = AND. When you select tag filters from different tag groups, you can imagine the word 'AND' between them. This will only pull up events that include all of the tags you've selected.
Show events without a tag
Add tags to the filter bar to find events that have not been assigned tags from that group.
Select the Events page in the top navigation.
Select Filter in the top left to expand the filter menu.
Select a tag from the left sidebar to add it as a filter.
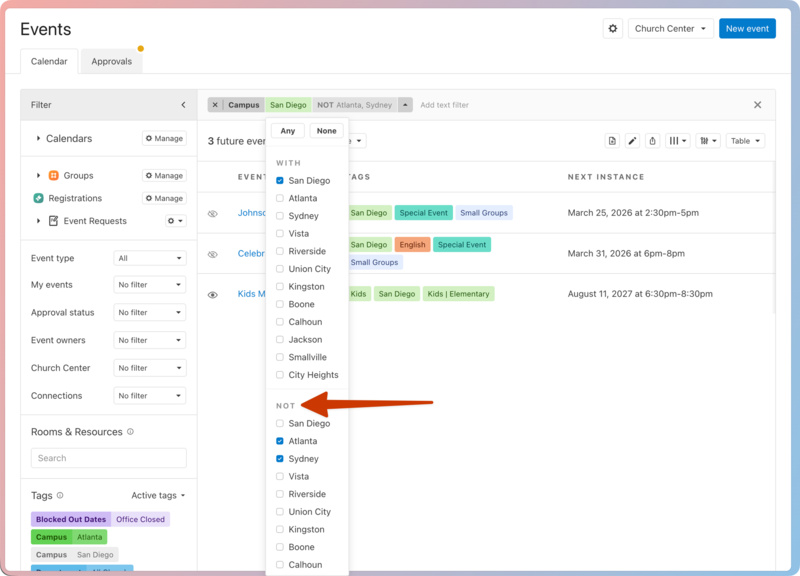
Select the arrow next to the tag in the top filter bar.
Select the tag names in the NOT section of the dropdown that appears.
Find events missing required tags
If you have a required tag group and want to see how many of your events are missing a tag from it, use the table view to find them.
Select the Events page in the top navigation.
Select the Month dropdown in the top right if the page is not already in table view.
Choose Table from the Event View dropdown.
Select Filter in the top left to expand the filter menu.
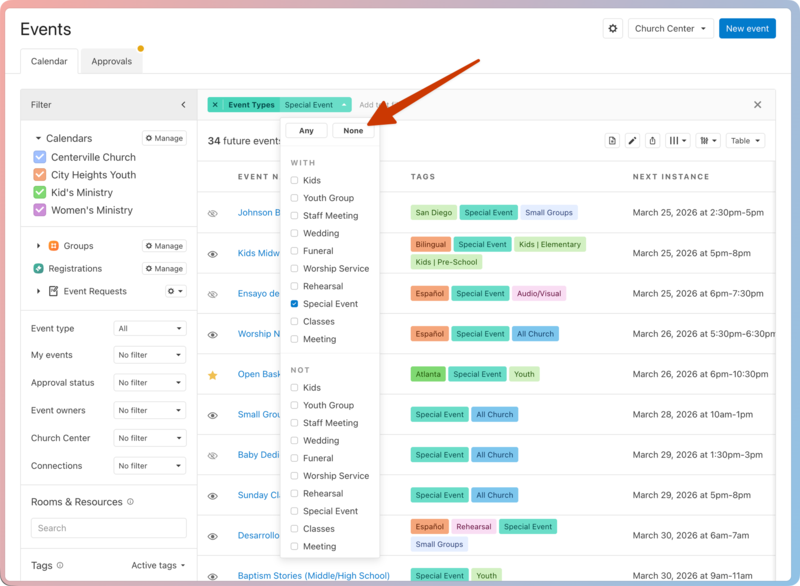
Add a tag filter from the desired tag group.
Select the arrow next to the tag in the top filter bar.
Select None from the dropdown that appears.
From here, you can use bulk editing to apply the missing tags to these events!