Set up split teams
Split teams allow one team to have people who can serve at different times. You can create a new split team, enable a split team after creating it, or merge two or more existing teams into a split team.
Important
If the teams for each time have different leaders, create two separate teams instead of creating a split team.
Split teams make it easier to manage teams that serve at multiple times. By assigning people to one split team instead of multiple separate teams, you can:
Help team members communicate preferences. Team members can specify their preferred service time on the Scheduling tab of their profiles (next to their other scheduling preferences).
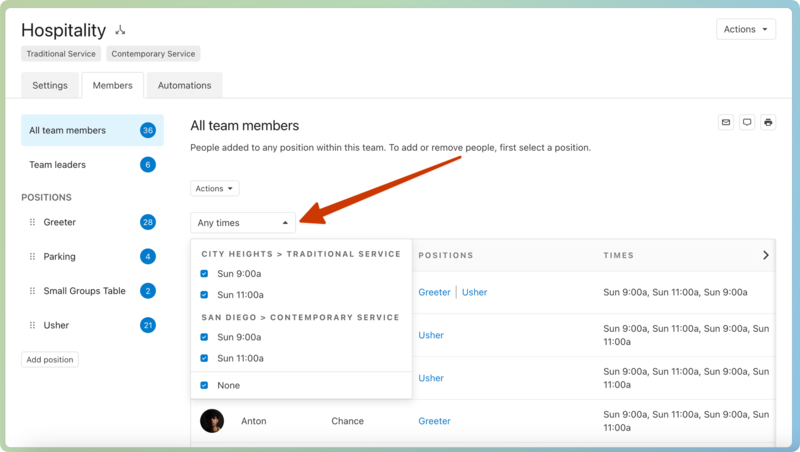
Identify member assignments. From the Members tab of your split team, you can filter team members by their preferred time using the dropdown above the member list.
Find backups. If all team members are unavailable for one time, you can choose someone who normally prefers a different time.
Create and schedule a split team
Create a split team
You can turn on the split team setting when creating a new team or you can split an existing team.
To split an existing team:
Select the People page from the top navigation in Services.
Select the Teams tab to view all of your organization's teams.
Use the dropdown in the top left to filter the list by My Teams (teams where you're a leader or member), All Teams, Archived Teams, or specific service types.
You can also search for a specific team by name using the search bar.
Select a team name to open that team's member list.
Select the Settings tab.
Check the box under the Split Team section.
Set time preferences
Before scheduling your team, you'll need to set up time preferences on the service type's settings page. These time preferences will apply to every split team in this service type, so these times should match your actual service times, not report times or rehearsal times.
Time preferences are necessary for split teams because:
Split team members use time preferences to tell their leaders which service time they prefer.
Time preferences determine which service times appear as options when adding needed positions on a template.
Tip
If you occasionally have an extra service time, such as on Easter, do not add it as a time preference. You'll still be able to schedule team members for that additional time in your special service plan without adding it as one of your regular time preferences.
Schedule or assign people to times
Now that your split team is set up, you can schedule people for a plan! If you haven't scheduled this team before, you'll need to add needed positions to your plans:
Select the Plans page in the top navigation.
If you have multiple folders, select the folder that contains the service type you're working with.
Select a plan from the service type for which you're scheduling.
Select the Teams tab.
Select Team actions in the top right.
Choose Needed Positions from the dropdown. Split team positions will appear for each service time on this plan.
Use the +/- buttons to set how many positions you need for each service time.
Select Done.
If you converted an existing team into a split team, previously scheduled team members may be assigned to multiple times in a plan, so you'll need to assign them to only one time.
To reassign a previously scheduled person:
Select the Plans page in the top navigation.
If you have multiple folders, select the folder that contains the service type you're working with.
Select a plan from the service type for which you're scheduling.
Select the Teams tab.
Select a team member's name.
In the popup, uncheck the boxes next to any service times that no longer apply to this team member.
Select Save.
Warning
If you remove a person from the only time they were assigned to on a split team, they are completely removed from the plan.
Merge teams into a single split team
If you currently have more than one team for each service time, you can merge those teams into one split team. For example, if you have a 9 a.m. Greeters team and an 11a.m. Greeters team, you can merge them into a split team with both times.
Set time preferences
Before merging teams, make sure that the time preferences on the service type's settings page are correct. These time preferences will apply to every split team in this service type, so these times should match your actual service times, not report times or rehearsal times.
Merge teams
Once your service type's time preferences are correct, you can merge teams by following the steps in the create or edit a team article.
Warning
Merging teams cannot be undone. The old teams will be deleted and can only be recovered for up to 30 days after the merge.
The old teams' scheduling history will be tied to the newly merged team and cannot be reverted, even if you restore the old teams.
Your old teams will be deleted, and only the new merged team will remain. Old teams can be recovered for up to 30 days, so you can restore those deleted teams if you chose the wrong options, but the merged team won't revert to its previous state.
Any chat conversations that belong to the old team are deleted. If the old team was included in any multi-team conversation, those conversations remain, but the old team is removed.
The old teams' scheduling history will permanently change to reflect the new merged team, even in templates and past plans. Other scheduling information, such as the Replies To Person, assigned times, scheduling status, and notification settings, will stay as they were.
Everyone assigned to positions in your old teams will be assigned to the corresponding positions in your merged team for the selected time preferences.
If the old teams included additional positions that weren't part of the new team, those positions will be created in the new merged team.
All needed positions in plans or templates will be recreated for the new merged team and assigned to the time options you created.
If you previously sent scheduling emails for the old team, those people will still be able to respond using the links in the original scheduling email.
Assign time preferences
Your team members can set their own time preferences, and team leaders can also set them for team members.
Ask team members to set preferences
You can ask team members to set their scheduling preferences or double-check them to ensure they're correct. To email all team members:
Select the Plans page in the top navigation.
If you have multiple folders, select the folder that contains the service type you're working with.
Select the ⚙️ settings icon to the right of the service type that contains your team.
Choose Teams from the dropdown.
Select the team's name to open the team's Members tab.
Select the ✉️ email icon in the top right.
Send an email encouraging your team members to set their scheduling preferences. You can include links to articles that explain how they can set scheduling preferences from their profile on a web browser, iOS app, or Android app.
Set preferences for members
If a team leader knows their team members' preferred times, they can set those preferences for them on the team's Members tab.
Select the Plans page in the top navigation.
If you have multiple folders, select the folder that contains the service type you're working with.
Select the ⚙️ settings icon to the right of the service type that contains your team.
Choose Teams from the dropdown.
Select the team's name to open the team's Members tab.
Select a position from the left sidebar.
Select a team member's current time preferences from the Times column.
Choose new time preferences using the check boxes in the dropdown that appears.
Select a team member's current scheduling preference from the Preferences column.
Choose how often the person would like to be scheduled from the dropdown that appears.
Tip
If you want to select more than one week a month (like the first and third weeks), use the Choose Weeks option.