Batches
Batches are designed to track physical donations, such as cash and checks, donations from external payment sources, and donations imported from other systems.
Important
Counters can access, create, and enter donations to batches, but only administrators or bookkeepers can commit them.
To enter batched donations, you'll first need to create a batch, then set the batch defaults. From there, you can enter donations manually or with a check reader, and then commit the batch. When you import donations, an in progress batch is created automatically.
Set up batches
The first step to entering donations is to create a batch and, optionally, a batch group. Batches can be customized to best fit your organization's setup. Possible organization systems include separate batches for Cash and Check donations within a batch group created for a specific Sunday, or separate batches for each weekly service within a batch group for the week. For example:
Batch group: Sunday - 05/31/2026
Batch: Cash - 05/31/2026
Batch: Checks - 05/31/2026
Batch group: Sunday - 05/31/2026
First service - 05/31/2026
Second service - 05/31/2026
(Optional) Create a batch group
Batch groups help you organize your batches into groups with common characteristics. They are optional and can be customized to fit your organization's workflow.
To create a batch group:
Select the Batches page in the top navigation in Giving.
Select the In progress tab
Select New group.
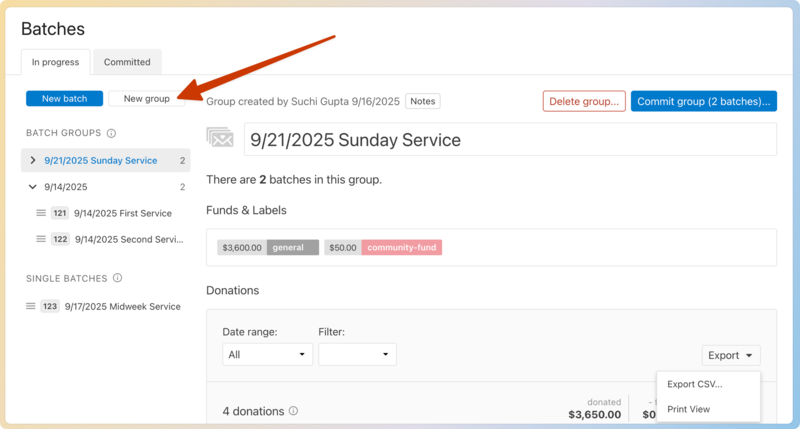
To add existing batches to the group, drag and drop them from the Single Batches section in the sidebar to the group in the Batch Groups section.
Create a batch
To create the batch, go to the Batches page and select New Batch.
Tip
Creating a new batch while a batch group is selected will create it within that group.
Select the Batches page in the top navigation in Giving.
Select the In progress tab.
Select New batch.
Edit batch defaults
Batch defaults allow you to preselect the fund, payment source, payment methods, received date, and labels for a batch that will apply to all (or most) donations entered. With all of these fields preselected, you can move quickly through the donation entry process.
Select the Batches page in the top navigation in Giving.
Select the In progress tab.
Select the newly created batch where you will enter donations.
Select Batch defaults to expand the batch default options.
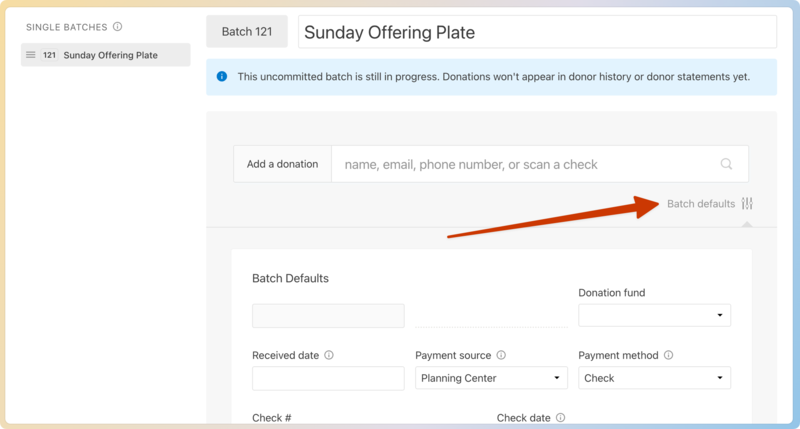
Enter details for all or some of the default fields.
Fund: Set the Fund field to the fund that donations are given to most commonly.
Received date: If the dates for all donations in the batch are the same, add the Received date; if not, leave this blank and add the date to each donation.
Payment source: Set the payment source to the one from which the majority of the donations originated.
Payment method: If you are entering a batch of only checks or only cash, set the payment method and payment method details to speed up the process.
Select Save to set the default fields.
Add donations to batches
After you've created a batch and set the batch defaults, you're ready to enter donations! Donations can be added manually or quickly assigned to a donor using a check reader.
Add donations manually
Select the Batches page in the top navigation in Giving.
Select the In progress tab.
Choose the batch you created, and place your cursor in the Add a donation box.
Type the donor's name, email, or phone number. As you enter the information, the system will try to match the entry to the names in the People database.
If a match exists, select the matching name.
If there's no matching name, finish typing the new donor's first and last name, and select Create new person: [Name].A profile will be created and added to your database.
Verify that the donor's information is correct. Select Edit next to the donor's name to add additional information.
Select Join donor in the top right to join the donor with another person. If the donor is already joined, select the name of the joint donor to view their profile or disjoin the donors.
Enter the donation details. The batch's default settings will automatically be entered into the donation record. If needed, override those defaults by adding new information.
Amount: Enter the amount of the donation.
Fund: Choose the fund to which the donation was given.
Select the ⊕ plus icon to enter a split donation across multiple funds.
Received date: Enter the date the donation was received. This is the date that determines when the donor receives credit for the donation, so pay special attention to this field, especially at the end of the year.
Payment source: Choose a payment source from which the donation was received.
Payment method: Choose a payment method for the donation. The default Planning Center payment source allows you to choose between check or cash. Any additional payment sources you have added allow you to choose between check, cash, ACH, or card.
If you chose Check, enter the check number and check date.
If you chose ACH, enter the last four digits of the account number and the bank name.
If you chose Card, enter the last 4 digits of the card and the card type (credit, debit, prepaid, or unknown).
(Optional) If the donation was given to a fund that has a memo line turned on, enter a memo for the donation.
Select a campus from the dropdown to assign the donation to a campus. This field is preselected based on the campus listed on the donor's profile in the People product.
(Optional) Add a note to the donation. Notes are only visible to administrators and bookkeepers, never to donors.
(Optional) Add a label to the donation. Labels are a great way to organize donations.
Select Next donation to add this donation and enter another.
Tip
Use keyboard shortcuts to save time while entering donations!
Use a check reader
If you use a check reader, place your cursor in the Add a donation box and run the check reader.
The check reader enters the information from the check into the donation fields. If there's a problem, the fields are cleared.
If the routing and account numbers are correct, you'll be taken straight into the donation details entry form for a quick entry.
If there is no match with a previous donor, select Associate New Donor to choose a different donor for that check.
Important
When someone uses a bill-pay system, the MICR number is shared with anyone else using bill-pay at that same bank. The last donor assigned to that MICR number is recognized when reading bill-pay checks from that bank, so it may be better to process bill-pay checks manually to avoid errors.
Commit the batch
After you've finished creating a batch and adding donations, the final step is to commit the batch. It is important not to miss this step, as before a batch is committed, it's considered in progress, and donors will not see their donation until the batch is committed.
When a batch is In Progress:
The donations appear on the dashboard and on a donor's profile in Giving, visible to administrators and bookkeepers.
The donations do not appear to the donor when they log in to Church Center or on any generated donor statements.
Automations do not trigger for the in-process donations.
The donations are not included in list results in the People product.
The donations are marked with an Uncommitted stamp.
Changes to the batch details (name and notes) and donations are not logged.
To commit the batch:
Select the Batches page in the top navigation in Giving.
Select the In progress tab.
Choose the batch you are ready to commit.
Review all donations to make sure everything looks accurate.
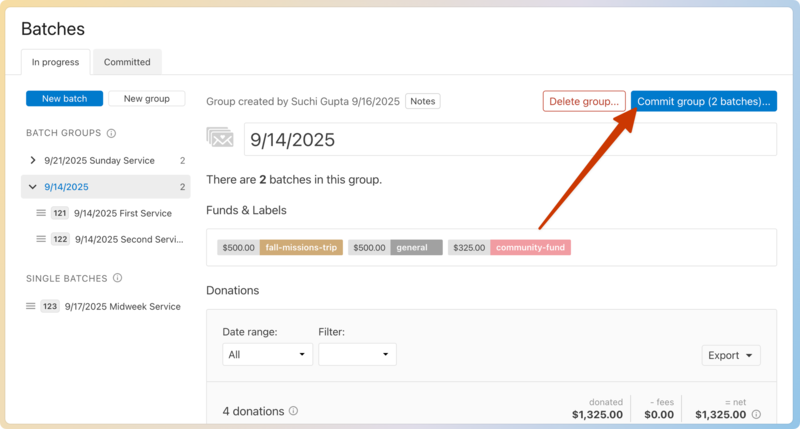
Select Commit batch…
If the batch is part of a batch group, the Commit batch… button won't be available within a single batch. You must select the batch group, then select Commit group ([Number] batches)… to commit all batches at once.
After a batch is committed:
The donations become successful, fully qualified donations, and are visible to the donor from their donor profile or year-end statement.
Email receipts will be sent to the donors unless you turn off this option in Payment Sources.
Changes to committed batches and donations are logged in the system logs.
Tip
Donations can be added to committed batches. When entered, a receipt is sent (if receipts are enabled), and the entry is immediately tracked in the system logs.
Delete a batch
There may be scenarios where a batch needs to be deleted. In those instances, administrators and bookkeepers can delete both in-progress and committed batches. Counters only have access to delete in-progress batches.
Deleting a batch deletes all donations inside it, including committed donations.
Warning
Any time a committed batch is deleted, the action is recorded in the system logs detailing the date, the person who deleted it, and the batch name.
Select the Batches page in the top navigation in Giving.
Select the In progress or Committed tab, based on where the batch you want to delete is located.
Choose the batch to delete from the list.
To delete a single batch, select Delete batch… in the top right.
To delete a batch group, select Delete group… in the top right to delete all batches in the group. To delete a single batch from a batch group, first drag the batch to the Single batches column, then delete it.