Create and manage funds
Funds are used to track the intent of a donor's donation. Once created, funds can be made available to donors giving online, as well as restricted for administrator use only, such as adding donations to batches.
Giving is designed to handle donations only, so funds should be created only for these transactions. Sales, payments, or reimbursements can be tracked outside of Planning Center. For US churches, consult the Tax Guide for Churches and Religious Organizations.
Important
It is important that you review information about Stripe's rules and restrictions before creating funds to ensure you stay in compliance.
Want to watch a video before you get started? No problem! This three-minute video will show you the steps in this article in action.
Create a fund
To create a fund:
Select the Manage page in the top navigation in Giving.
Select the Funds tab on the left.
Select New fund.
In the Name box, give the fund a short, but descriptive, name.
Naming tips:
Instead of adding dates to annual funds, open and close a fund that will be used seasonally.
If your fund will be used for a pledge campaign, match the fund's name with the campaign's name.
Tip
If you have multiple campuses, do not create separate funds for each campus. Instead, enable the campus dropdown on the online donation form to collect campus data. Learn more about using Giving for multi-campus churches in the Use Giving for multi-campus churches article.
(Optional) If your general ledger uses numeric codes to organize funds, enter it in the Ledger Code box.
Choose a color in the Theme section to help differentiate funds at a glance. The theme is only shown on the administrator side of Giving.
In the Description box, add a brief description of how this fund will be used. Fund descriptions are visible to donors when they donate on Church Center.
In the Visibility section, choose the fund's availability on Church Center. Choose from the following options, based on how you will use the fund:
Listed: The fund will appear in the fund dropdown on the donation form, allowing anyone to donate to it. It can also be used as the default fund on the donation form.
Direct link: This fund cannot be selected from the default donation form. Donations can be made to this fund using only the direct link or through Text2Give.
Unpublished:Only administrators, bookkeepers, and counters can designate donations to this fund. Choose this option if you are setting up Giving and don't want donors to donate on Church Center quite yet.
Select Copy in the Church Center URL box to share the fund's direct link so the fund pre-populates when donors give online.
If you have enabled memo lines in the donation form settings, check the box in the Memo field section to allow notes to be included with donations given to this fund.
Check the box in the Text2Give section to allow donors to donate to this fund via text. Set up a fund shortcut to make it easier for Text2Give donors to designate their donation to that fund.
Scroll up and select Save to create the fund.
With the exception of the general fund, you can drag and drop open funds to change the order. The order of funds on the Funds page will also be reflected in the Fund dropdown on your donation form and in batches.
Edit a fund
To edit a fund:
Select the Manage page in the top navigation in Giving.
Select the Funds tab on the left.
Choose the fund you need to edit from the list.
Edit the name, ledger code, theme, and description in the Options box.
In the Accepting donations section, choose whether the fund is open or closed.
Open funds are available to accept donations.
Closed funds are not available to accept donations on Church Center. Administrators, bookkeepers, and counters can designate donations to these funds.
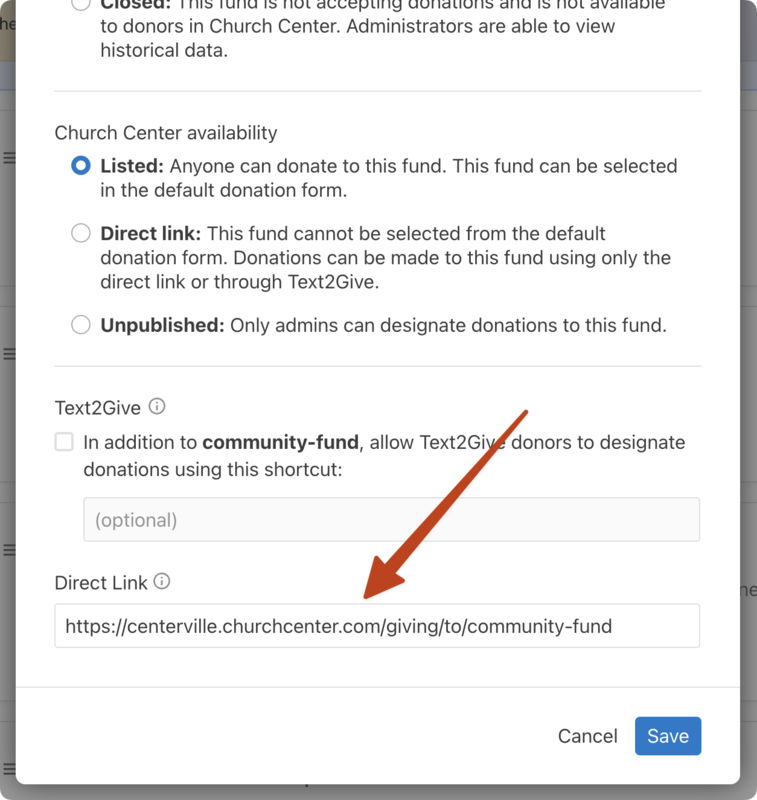
If the fund is set to open, adjust its availability on Church Center in the Visibility box. Choose from the following options:
Listed: The fund will appear in the fund dropdown on the donation form, allowing anyone to donate to it. It can also be used as the default fund on the donation form.
Direct link: This fund cannot be selected from the default donation form. Donations can be made to this fund using only the direct link or through Text2Give.
Unpublished: Only administrators, bookkeepers, and counters can designate donations to this fund.
Select Copy in the Church Center URL box to share the fund's direct link so the fund pre-populates when donors give online.
If you have enabled memo lines in the donation form settings, choose whether notes can be included with donations to this fund.
In the Text2Give section, choose whether or not donors can donate to this fund via text. If you're making the fund available through Text2Give, set up a fund shortcut to make it easier for donors to designate their donation to that fund.
Scroll up and select Save to save any changes made to the fund.
With the exception of the general fund, you can drag and drop open funds to reorder them. The order of funds on the Funds page will also be reflected in the Fund dropdown on your donation form and in batches.
Open funds
An open fund is one that can receive donations. In most cases, open funds should be set up as restricted funds that reflect the donor's intention of how their gift should be spent.
There are four types of open funds which are explained further below: default, listed, direct link/link only, and unpublished.
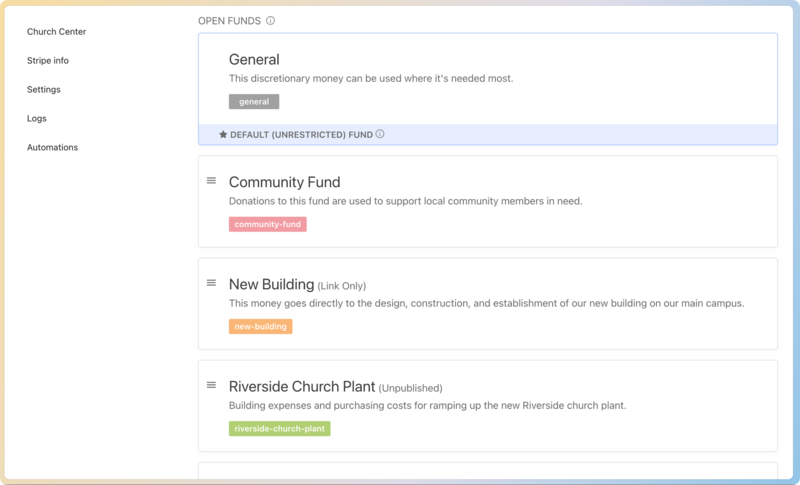
Default fund
A default fund is created when you first set up Giving, and is automatically selected on your donation form on Church Center. This fund is also selected if another is not designated while using Text2Give. For this reason, it is suggested that you use the default fund for your church's discretionary fund.
The default fund cannot be closed. However, you can change your default fund by contacting Planning Center Support.
Listed funds
Listed funds are available to donors on your donation form and to administrators in batches.
Unpublished
If you need to keep a fund open but hide it from online giving, set it to Unpublished. This allows administrators to designate donations to the fund in batches, but hides it from your donation form on Church Center.
Recurring donations to a fund that becomes unpublished will continue to process based on their scheduled frequency. While new recurring donations to unpublished funds can be set up by administrators from a donor's profile, they cannot be created by donors on Church Center.
Closed funds
Funds can be closed when donations are no longer accepted. Once closed, the fund is hidden from your donation form, but recurring donations will continue to go to this closed fund until changed either by the donor or an administrator, per the donor's request.
If a donation was designated to a specific fund, and there's a need to change or close that fund, contact the donor for permission to reassign their donation or refund the donation before making changes.
Warning
If a fund is no longer needed, close it instead of renaming it. If you rename a fund, the action is logged to ensure donations aren't mismanaged.
Re-open a closed fund
Closing a fund is not a permanent action; the fund can be reopened if necessary.
If you receive seasonal donations for a specific fund, close the fund once those donations are no longer being collected, and reopen it when they need to be received again. This keeps your funds list clean and helps the church designate funds in the best way for any season.
Delete a fund
Funds can only be deleted if they have no donation history or associated recurring donations. To delete a fund:
Select the Manage page in the top navigation in Giving.
Select the Funds tab on the left.
Choose the fund to be deleted from the list.
Select Delete in the bottom left corner of the popup.