Create and share donor statements
Donor statements provide donors with a list of successful donations over a specified period, which helps them file their taxes and report deductible donations. An attached cover letter also allows you to tell donors how their donations benefited your church. Prepare your statements by choosing a date range and verifying information before sending the statements.
Before creating a new statement, review the following items that might apply to your situation:
If you receive donations outside Planning Center, show where the donation originated by adding another payment source.
Combine donors who would like to see their giving on the same statement.
Canadian and New Zealand organizations: To include a signature on official tax receipts, upload the signature image in settings.
Important
Signatures only appear in the cover letter of printed statements.
Review deliverability report
Before creating a statement, review the deliverability report to get a picture of your donors' contact information and determine who might not receive a statement.
To review the report:
Select Manage in the top navigation.
Select the Statements tab.
Review the deliverability report at the top of the page. If someone is missing an email address, mailing address, or both, you can add the contact information before generating statements.
Based on the missing information, decide whether to deliver the statement by email, mail, or a smart mix of both.
Tip
Encourage people to give online, where you can be sure to get their email addresses. Additionally, contact donors at the end of each year and request they update their contact information in their profiles on Church Center!
Create a new statement
After looking over the deliverability report, go ahead and create a new statement.
Important
Although all donations are visible in a donor's history, statements do not include failed donations, refunded donations, and ones in progress.
On the Statements page, select Create a new statement.
Add a statement label. Name your statement so that it communicates the date range it reports, as it is visible to you and your donors.
Enter a date range for the statement. The date range you select includes all donors (including inactive donors) with at least one successful donation in the statement's date range.
Tip
If a donation is missing, check the donation's received date against the date range you selected. The received date is not editable for any online giving, but can be edited for donations in batches, such as cash and checks.
Select Save to create your statement.
Once the statement is created, you can configure it.
Configure statement
On the Configure tab, review the information listed to decide how you'd like to display addresses, what should show on the donation table inside statements, and whether or not you want to include non-deductible donations and pledge campaign progress.
Warning
Giving warns you if any donations are excluded from the statement, such as those that were refunded, failed, haven't been committed, or are in transit. When the warning is present, make sure your batches are committed or wait a few days for transactions to settle before sending donor statements.
Verify that the From address field is correct. You can edit the address in the textbox if you need to change it for this particular statement only.
Canadian organizations: If this receipt is being issued from a location different than the From address, enter the city, town, and municipality where this statement was issued to meet the CRA requirements.
Important
To change the address permanently, an organization administrator must change it on the Organization page in Account settings.
Choose to use the default information displayed in the To address field or add other information using the following variables:
Variable
Output
{{ donor.full_name }}
Includes all possible name fields, except nickname. Example: "Dr. John (Johnathan) David Smith Jr."
{{ donor.full_legal_name }}
Includes first (or given if present), middle, last, and suffix. Example: "Johnathan David Smith Jr."
{{ donor.first_name }}
Includes first name.
{{ donor.last_name }}
Includes last name.
{{ donor.name_prefix }}
Includes prefix.
{{ donor.name_suffix }}
Includes suffix.
{{ donor.donor_number }}
Includes assigned donor number.
{{ donor.address }}
Includes address.
In the Include items section, use the dropdown to select what to include in the donation table.
Important
Memo lines, if enabled, will not appear on statements.
Check the applicable boxes to include or exclude non-deductible donations (such as donations received from donor-advised funds or qualified charitable distributions) and the status of campaign pledges during this time period.
Statement configurations save as you make them. Once you complete configuration, you can edit and send the statements.
Edit and send statements
You can send statements to your donors via email, mail (by printing the statement and mailing them), or both.
Avoid printing statements unnecessarily by following this process:
Send email statements.
See how many are downloaded from the Deliverability Status on the Email tab a week or two later.
Print statements, excluding donors who have already downloaded their statements through email.
If you'd like to send both email and printed statements, start with email statements.
Warning
Once a statement has been sent, the label, date range, and statement itself cannot be edited, and the statement will be available to donors online. Statements can be deleted at any time until they’re sent out by email.
Email statements
Emailed statements include a cover letter and a link for donors to download their statements on Church Center. Emails can be customized to fit your church's culture and language.
Important
The download link is a secure link to their statement that expires after two weeks. After the link expires, donors can still use the link to access their statement, but they will need to log in to access their statements in their donor profile on Church Center.
To email your statements:
Select Email on the Statements page.
Review the email details, including the donor recipients, the From email address, the reply-to email address. You can also download a CSV to review the donors who will receive an email, and edit the cover letter content.
Adjust the subject line if necessary.
If you don't want to include a cover letter, uncheck the Include cover letter box.
If you do include a cover letter, use the text editor to adjust the cover letter to your liking. Add links, adjust the text size, and add available variables to address donors by name.
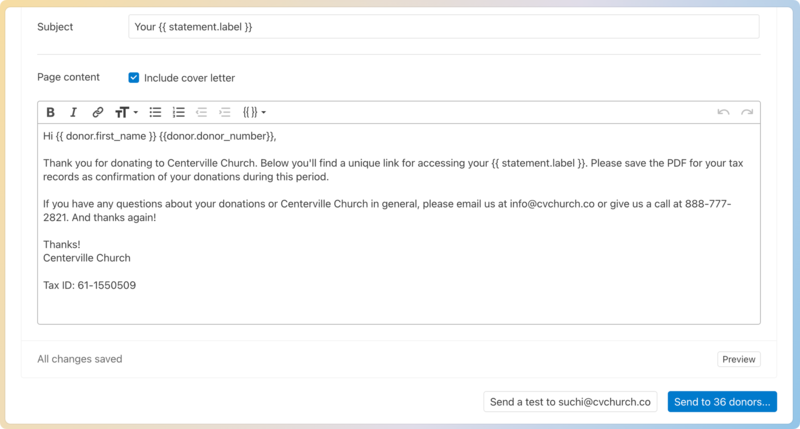
Select Send a test to to send a test email to yourself and see if the email is formatted the way you want.
Once you've formatted the statement message to your liking, select Send to donors.
After you send the email, the Email tab shows the number of people who have and have not accessed their statement. Download a CSV to review these individuals.
There isn't a way to resend email statements, but donors always have access to all statements, both past and present, in their donor profile on Church Center.
Warning
Once a statement has been emailed, the label, date range, and the statement itself cannot be edited or deleted.
Print statements
Select Print on the Statements page.
Choose who to generate printed statements for. If you've already emailed statements, you can send printed statements to donors who received an email, even if they have or haven't viewed it.
In the Page content section, use the dropdowns to move the addresses and logos, and then choose to include or exclude a cover letter.
In the Printer settings section, adjust the settings to allow for double-sided printing or force a page break after the cover letter.
If you're including a cover letter, use the text editor to adjust the cover letter to your liking. Add links, adjust the text size, and add available variables to address donors by name.
Warning
When editing the cover letter text, do not remove the {{ statement_content }} placeholder. If removed, all statement content is deleted.
Select Download a test to see if the statement is formatted the way you want.
Once you've set the statement how you want it, select Generate statements. As statements are generated, you'll see their progress from the Print tab. The file might take a few minutes to reach your email or be available to download.
The downloadable file includes two folders: one with statements for donors with mailing addresses and one with statements for donors without.
Tip
If you chose to use an address format other than the #10 windowed envelope position, create mailing labels in People to mail statements.
Download copies of all donor statements
Even though donors can always access their statements on Church Center, you've likely had a donor reach out after statements were sent asking for a replacement. Consider downloading a copy of all statements to help in these situations, as well as keeping a copy for your records.
Go to the Print tab of your statement.
If you previously emailed most statements and only printed a handful of them, select Edit & regenerate. Confirm you'd like to reset print statements in the popup warning and adjust the statement settings.
In the Generating for line, change the inclusion options to include donors who were emailed a statement even if they have viewed it.
Confirm the remaining settings and select Generate statements at the bottom of the page.
After the statements have been generated, download the zip file to maintain a copy of all donor statements.
Statement preview
The examples below show what you can expect on a basic donor statement. All statements include an optional cover letter.
US donor statements show the date and amount of the gift, how it was given, and to which fund. They also show the total, which you can break down into subtotals based on funds if you'd like.
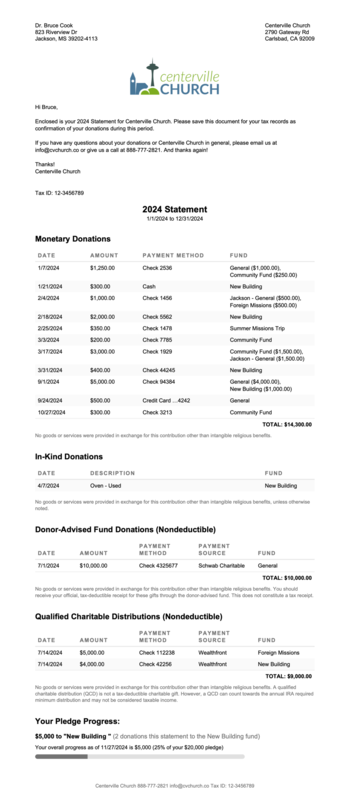
Change the tax disclaimer in the Settings, if needed. If the church information below the disclaimer is incorrect, an organization administrator can change it from the Accounts page.
If you have opted to generate an official Canadian Revenue Agency (CRA) donor receipt, the Canadian donor statement includes all the mandatory fields and compulsory information required by the CRA.
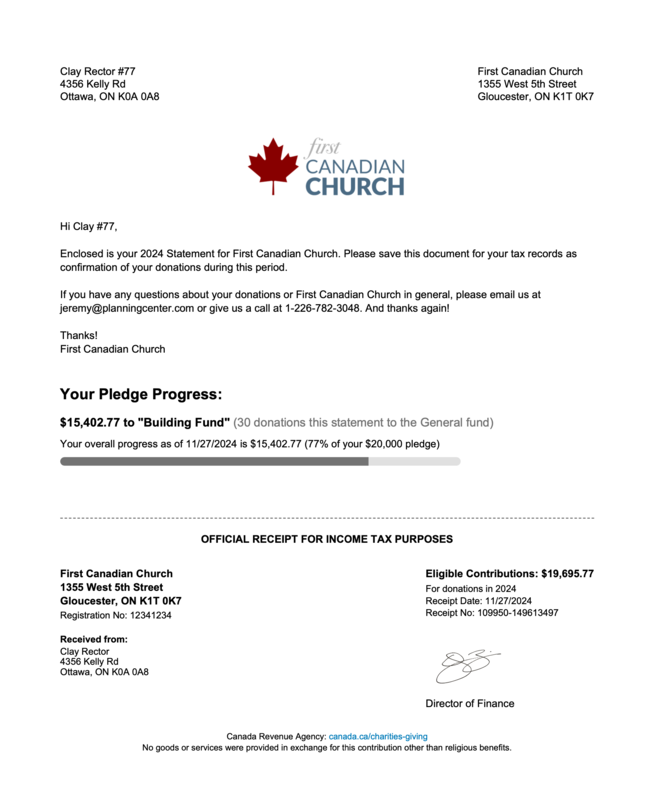
Canadian statements forgo the individual listing of donations on donor statements and provide just the total tax-deductible amount as reported by your church. The statement includes a receipt number and the number of the receipt it replaces, if applicable.
Your treasurer's signature, which can be edited on the Settings tab in Giving, is also included. You can upload a new signature at the appointment of a new treasurer without modifying historical statements that were previously issued.
Change the tax disclaimer in the Settings, if needed. If the church information below the disclaimer is incorrect, an organization administrator can change it from the Accounts page.
Australian tax receipts show the date and amount of the gift, how it was given, and to which fund. They also show the total, which you can break down into subtotals based on funds if you'd like.
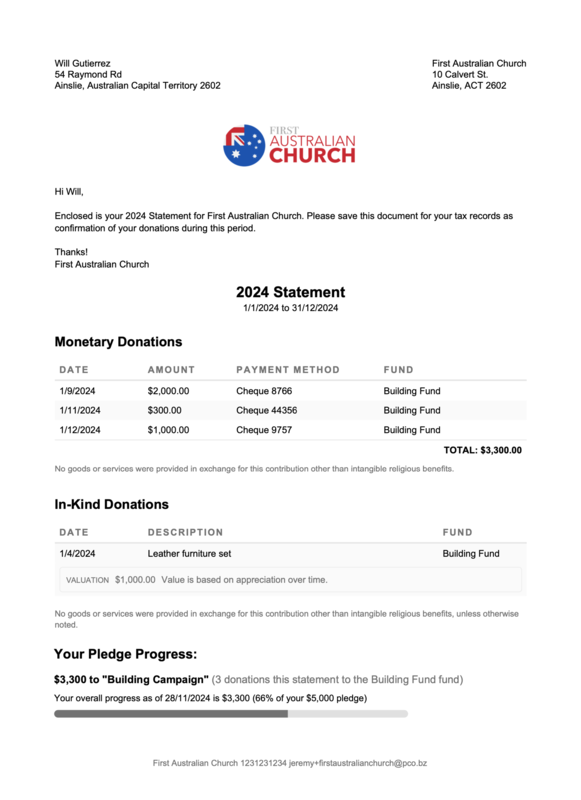
Change the tax disclaimer in the Settings, if needed. If the church information below the disclaimer is incorrect, an organization administrator can change it from the Accounts page.
Statements can be generated when you need to provide a receipt of donations to your donors.
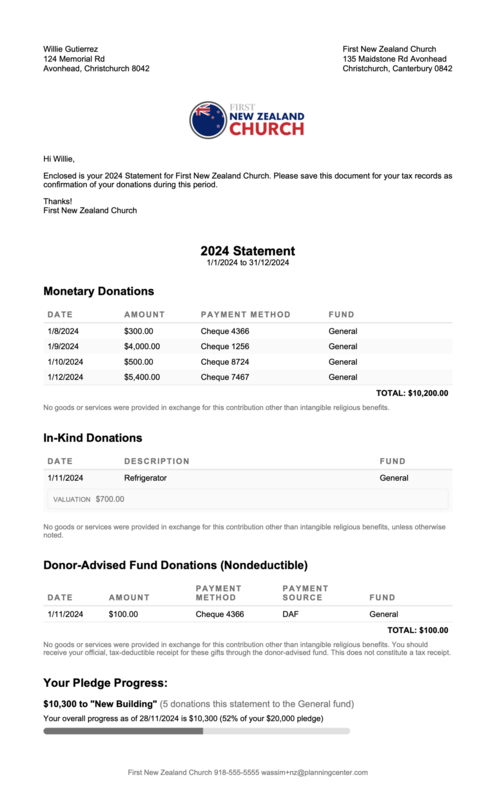
New Zealand organizations can choose to generate a statement that meets the Inland Revenue Department's requirements for filing taxes on the Configure tab.
Change the tax disclaimer in the Settings, if needed. If the church information below the disclaimer is incorrect, an organization administrator can change it from the Accounts page.