Share your plan
Share your plans with other team members or people in your congregation! You can share plan links with people who have Services profiles, or publish your plans on Church Center so anyone without a Services profile can view the plan details you choose to include.
There are a few different ways to share a plan, depending on your church's needs:
Services LIVE: Share a Services LIVE view of your plan so your team can keep track of plan details in real time. This can be helpful to display in tech booths or backstage monitors. See the What is Services LIVE? article to learn more.
Enable Public View: Publish a basic version of your plan on Church Center so people without Services access can see it. Add the public plan link on your church's website or create custom page in Church Center.
You can also schedule publish plans for an entire service type. This helps if you want to automatically publish plans in Church Center on the day of the service.
Warning
Do not use this option for plans with details that should be private, such as funerals, weddings, special events, or meetings.
Share Worship Set: Share your upcoming plan's song list on X or Facebook so the congregation can be ready to sing along!
Permalink: Create a link that automatically redirects to the plan closest to today. You can choose whether to link to a Services plan page (which requires login), a public plan, or a Services LIVE view.
Share a public plan
Publish your plan page on Church Center so people without Services access can see your service details! The public view setting must be enabled on a plan-to-plan basis, but you can also choose to schedule publish plans in a service type.
Important
Before sharing your plan: Choose which plan details you'd like to show in Church Center by going to the Public View section of the service type's settings page.
Select the Plans page from the top navigation in Services.
If you have multiple folders, select the folder that contains the service type you're working with.
Select a plan from the service type you're working with.
Select the Order tab.
Select the share button in the top right corner.
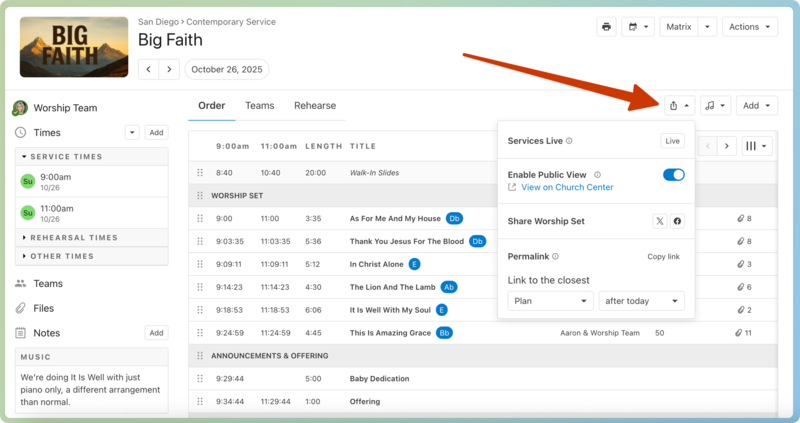
Select the Enable Public View toggle in the dropdown to publish this plan on Church Center. This only applies to the current plan you're viewing.
Select View on Church Center to view the public plan page.
You can share a public plan by copying the URL from the public plan page and providing the link to others or using a permalink if you don't want to open the public plan page every time.
If any of your songs have public attachments, anyone viewing this page can select the platform next to the song to listen to it on that platform.
Schedule publish plans from a service type
Toggle the Schedule Publish setting on a service type's settings page if you want to automatically publish plans on the day of the service.
Select the Plans page from the top navigation in Services.
If you have multiple folders, select the folder that contains the service type you're working with.
Select the ⚙️ settings icon to the right of the service type you're working with.
Choose Settings from the dropdown.
Select the Schedule Publish toggle in the Public View section.
Check the boxes next to the plan information you'd like to include in the public plans page.
Important
The options in the Links section only apply to links that have been added to the song's scheduled arrangement. Item attachments and plan attachments will not be published in Church Center.
Once you toggle on the Schedule Publish setting, your plans will automatically be published in Church Center on the day of the service. The publishing date is based on the first service time listed in your plan's Times section.
Share your worship set on X or Facebook
Important
Planning Center never posts anything to your feed automatically. You must log in to share a post on one of your platforms. Planning Center has X and Facebook pages where updates and information are posted.
Select the Plans page from the top navigation in Services.
If you have multiple folders, select the folder that contains the service type you're working with.
Select a plan from the service type you're working with.
Select the Order tab.
Select the share button in the top right corner.
Choose either the X icon or the Facebook logo icon, depending on where you want to share your worship set:
When you choose the X icon: A box with a pre-composed post opens that includes all the plan's songs, a hashtag, and a shortened Public Plan page URL. You can edit the message if you'd like, then log in to X and post it.
When you select the Facebook icon: Your plan's editable information opens in a Facebook post. When people follow the link, they will go to the public plan page.
Share a permalink of your plans
Create a permalink that automatically redirects to the closest plan relative to today. This can be helpful if you need a link on your church's website that always takes people to last week's public plan, for example.
Select the Plans page from the top navigation in Services.
If you have multiple folders, select the folder that contains the service type you're working with.
Select a plan from the service type you're working with.
Select the Order tab.
Select the share button in the top right corner.
Use the first dropdown in the Permalink section to choose which type of plan link you'd like to create:
Plan: Share a link to the closest plan page in Services. The person opening the link must log into their Services profile and have the right permission level to view the plan.
This can be helpful for multi-campus setups where administrators, leaders, and volunteers need a quick look at other campuses' plans.
Public View: Share a link to the closest public plan in Church Center. Anyone with the link can view the plan as long as public view is enabled.
Services Live: Share a link to the closest Services LIVE view for people with the right plan permissions and Services LIVE permissions.
Use the second dropdown in the Permalink section to choose whether to link to the closest plan before today or after today.
The timeframe for "before today" or "after today" is based on your organization's timezone settings, not the viewer's timezone.
Select Copy link to copy the permalink to your clipboard. You can paste it on another site or add it to a bookmark for quick use.
Tip
Here are a couple of common permalink settings and their use cases:
Choose Public View before today so you can put the link on your church website and name it Last Week's Service. That link takes people to the closest public plan before the current day so they can view any available song links.
Choose Services Live after today for the computer that runs Services LIVE and either bookmark it or set it as the home page so the person responsible for the computer can access it.
Troubleshooting broken permalinks
If the permalink takes you to an error page, there are a few things that may be happening:
The plan isn't public: If you set up your permalink to redirect to a public plan, but the public view setting hasn't been enabled on the closest plan, the permalink won't work. Go to the closest plan before or after today and make sure to toggle on the Enable Public View setting.
The plan was deleted, or no plan exists: If the closest plan before or after today was deleted, the permalink won't work. Go back to your permalink settings and check the timeframe for your permalink (before or after today). If no plan exists before or after today, create a new one.
The plan has no service time: If the closest plan before or after today has no service time, the permalink can't consider that plan as existing "before or after today." Go to the plan you'd like the permalink to redirect to and make sure to add a service time.