Introduction for administrators
Welcome to Groups! With Groups, you can create small groups or classes for your church, schedule events, and facilitate communication between group members.
There are two roles in Groups that have administrative permissions.
Administrators have permission to manage all groups and settings in the account.
Group type managers have administrative permissions for all groups within the group types they manage.
Tip
If you cannot log in, follow the steps in the Log in to Planning Center article.
Setting up Groups
If you're setting up a Groups account for the first time, you'll go through a wizard to help you through the process.

Once completed, you'll return to the main Groups page to see all your groups and access any added sample data. Planning Center has created some group types, tags, and groups to get you started with your account.
Groups pages overview
Groups are a powerful way to keep your church connected—whether that's through regular meetings, group chat, or shared resources.
Manage different aspects of your groups by selecting the Groups, Reports, Events, and People pages from the top navigation.
Want to watch a video before you get started? No problem! This four-minute video will show you the steps in this article in action.
Check out the sections below to learn more about each page. Access to the pages and settings below varies based on roles and permissions.
Groups page
On the Groups page, administrators can view all groups in the account. Group type managers can only view groups from the group types they manage. Group leaders can only view the groups they lead.
From this page, you can:
Select Filter to view the groups list by group type, campus, status, meeting schedule, Church Center visibility, enrollment, or tag.
Select the ✏️ edit icon to edit, archive, or create events in all or only select groups.
Select the CSV export button to export a CSV of the filtered groups' data.
Select each column name to sort the list of groups.
To see details about an individual group, select the group from the list.
Reports page
On the Reports page, administrators can view reports and stats for all groups, while group type managers can only view reports for the group types they manage.
Select the 🖨️ print icon to preview a printable PDF of your groups' statistics.
Group leaders cannot access this page, but they can select the Overview and Attendance tabs on their specific group's pages to view reporting details.
Events page
On the Events page, administrators can view details about events happening across all groups, while group type managers can only view details for groups in the group types they manage. Both roles can monitor, request, and record attendance.
Group leaders cannot access this page, but they can select the My Events tab to view event details for their group.
People page
The People page shows administrators the number of active group members.
Filter the page to narrow the list down to specific people, search by name, send an email, or export a PDF or CSV file.
Group type managers and leaders cannot access this page, but administrators can manually grant database access for group leaders, if needed.
Settings
Administrators can access all settings in Groups. Group type managers can access most settings, except tags. Group leaders cannot access settings.
With the exception of the People page, you can find the ⚙️ settings icon on all the main pages of Groups. From the ⚙️ settings dropdown, you can:
Choose Member requests to view and approve or reject pending group requests.
Choose Shared resources to view and manage files and links shared between groups.
Choose Shared locations to see every location shared across multiple groups. Locations can be viewed on a map, edited, or deleted from this page. To add new locations, select Add shared location in the top right corner.
Choose Group types to view and manage group types.
Choose Tags to add or edit tags for groups. Administrators can use them to filter the Groups page using a web browser, and congregants can filter groups on Church Center.
Manage group settings
Most group settings are available to group leaders so they can manage their groups day-to-day. Group leaders can create and edit events, add resources, update the group description and location, manage RSVPs, and take attendance.
However, some settings can only be updated by an administrator or group type manager, and some permissions are granted to group leaders only by an administrator.
Check out the following articles to learn more about how to update settings for individual groups and group types!
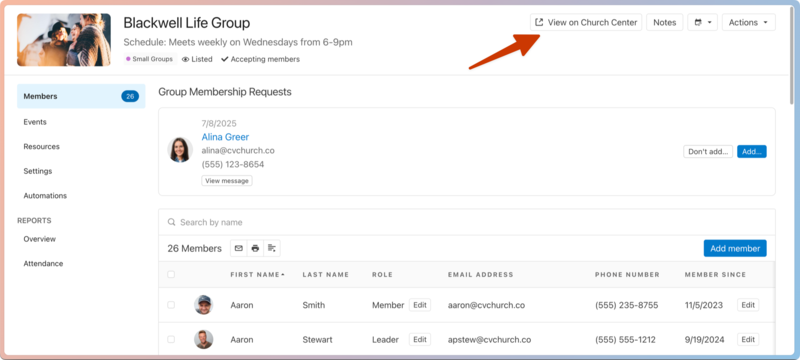
View groups in Church Center
People can join groups from the public group page in Church Center. The Church Center group page lists the group's description, location, schedule, and contact information.
To get to the public group page, select the Groups page in Church Center or select View on Church Center while viewing a group in the Groups product.
When people join a group or are added to a group, their information is saved in Planning Center People. They can log in to the Church Center app or website to access the groups they've joined.
Get help and support
Any time you have questions, Planning Center's support team is here to help! Use the ? question mark icon in the toolbar to open the Help and support sidebar.
From here you can:
Search online documentation for an instant answer to your question. The toolbar also suggests help articles based on the page you are currently viewing.
Access getting started resources or jump into Planning Center University (PCU). You can also connect with other Planning Center customers in the customer communities and see what's new by checking out the changelog.
Connect with a support agent for one-on-one help. You can email them directly from the toolbar, or schedule a phone call if you prefer.
Depending on which Planning Center product you're using, you can also contact support directly from the corresponding mobile app:
Services/People: Tap your profile icon in the top right, then tap Help to access help articles or open a ticket with support.
Check-Ins: Tap the ⚙️ settings icon in the bottom right, then tap Contact Support to open a ticket with support.
Music Stand: Tap the menu icon (three horizontal lines) in the top left, then tap Help to access help articles or open a ticket with support.
Organization administrator requests
The following Support requests can only be made by organization administrators:
Data removal or corrections you can't make yourself (undo old CSV imports, iCal imports, etc)
Gain access to anything that was created and managed by someone else in the account
Restore or fully delete a canceled account
Request access to Giving (if there are currently no Giving administrators in the account)