Attendance
Keeping track of who attended and when can help you gauge the health and engagement of your groups. Using Groups, administrators can request, edit, or add attendance.
Tip
If you don't want to get an email reminder about tracking attendance before every meeting, you can turn off reminders on the group settings page.
Monitor attendance
Consistent attendance data creates a clear picture of group health. On the Events page, administrators and group type managers can quickly view event attendance across multiple groups in the Status column below the calendar view. They can also request attendance from the leaders, update attendance, or view event notes.
To view only specific groups on this page, choose a group type from the dropdown or select Filter to choose a status, campus, or apply any tags you've created.
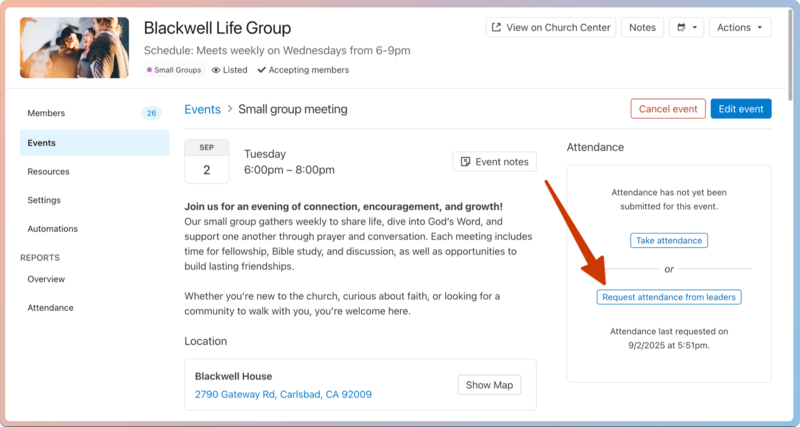
Request attendance
Administrators can set up recurring attendance reminders or request attendance for single events.
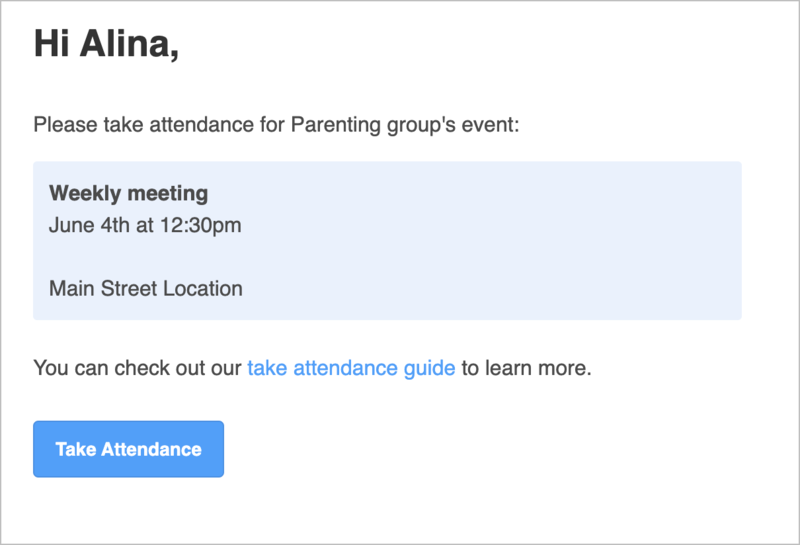
On the specific event page, select Request attendance from leaders to send an attendance request email to group leaders and any members designated to take attendance.
 |
Leaders and members designated to take attendance will receive an email to their primary email address. Selecting Take Attendance in the email will open the event's attendance form in a new browser tab in Church Center.
 |
Take attendance
Tip
Equip your group leaders and key members to take attendance in Church Center!
A group's Events tab shows each event's attendance status. Events are listed chronologically by default, showing the date and time, name, attendance status, notes, reminders, and RSVP responses.
Follow the steps below to take attendance:
From the Groups page, select the group where you'll take attendance.
Select the Events tab.
To the right of the current event name, select Take attendance to go to that event's attendance roster. Events that show Has not started yet will switch to Take attendance 60 minutes before their start time.
On the attendance form, check the box next to each present member's name. Members and leaders will always be on the roster, while visitors will only appear if they have been added and attended the previous event.
Tip
Visitors are removed from attendance rosters after they miss one event. If a visitor begins attending regularly, consider promoting them to a member by selecting the star next to their name. Once selected, the roster will refresh, and the visitor will be an official member!
Use the ⊕ plus or ⊖ minus icons to tally the number of visitors at the meeting.
To add someone new to the roster, select their role from the Add visitor dropdown and search their name. Select Create a new person if they're not in your database. When ready, select Add.
To finish, select Submit in the top right corner.
(Optional) Once submitted, you can make changes by selecting Modify in the Attendance section of the event page.
Record past attendance
Forgot to take attendance during your event? No worries! You can submit it any time to make sure reports stay accurate.
From the Groups page, select the group where you'll record attendance.
Select the Events tab.
Use the left and right arrows at the top of the calendar view to go to a date in the past.
To the right of the past event date, select Take attendance to go to that event's attendance roster.
On the attendance form, check the box next to each present member's name. Members and leaders will always be on the roster, while visitors will only appear if they have been added and attended the previous event.
Tip
Visitors are removed from attendance rosters after they miss one event. If a visitor begins attending regularly, consider promoting them to a member by selecting the star next to their name. Once selected, the roster will refresh, and the visitor will be an official member!
Use the ⊕ plus or ⊖ minus icons to tally the number of visitors at the meeting.
To add someone new to the roster, select their role from the Add visitor dropdown and search their name. Select Create a new person if they're not in your database. When ready, select Add.
To finish, select Submit in the top right corner.
(Optional) Once submitted, you can make changes by selecting Modify in the Attendance section of the event page.
Attendance reports
Use attendance reports to track attendance data for specific groups or multiple groups at once!
Important
Only administrators and group type managers can create attendance reports in Groups. Group leaders can view their groups' attendance reports in Church Center.
Individual group attendance reports
On a group's Attendance tab, you can track each individual's meeting attendance, their attendance percentage, and other attendance details.
Select the Groups page from the top navigation.
Choose a group from the list.
Select the Attendance tab from the left sidebar.
Use the dropdown in the top left to choose a timeframe for your report.
(Optional) Check the Show removed members box to include removed members in your report.
Review each group member's attendance data in the attendance report. Select the First Name, Last Name, or % percentage column headers to sort the list accordingly.
The % column shows each member's attendance percentage relative to the number of events in the chosen timeframe.
Important
Canceled events or those without submitted attendance are not accounted for in the percentage rate column.
A ✅ green check mark appears in the date column if a member attended a group event on that day. If the leader didn't take attendance, the column for that event is grayed out.
Visitors who have been added to the event roster on the group event page are counted with a "Visited" tag on the report. The tag disappears if they are made a member.
Scroll down to the Attendance totals section to see the total number of attendees for each event. Select a specific attendance total to go directly to that event's page, where you can add or edit attendance.
Select Print in the top right of the report to print or download the report.
Choose either Print View or Export CSV from the dropdown to open a print preview or download your data as a CSV.
Important
Print View for Groups is limited to approximately eight dates within an 8.5 x 11 sheet of paper. To print more attendance data, choose smaller date ranges to prevent reports from being cut off.
Multi-group attendance reports
Track attendance across multiple groups on the Reports page to monitor participation, spot low engagement, and help your group leaders take action where needed. You can choose whether to print a report or email yourself a CSV file of the report data.
Administrators can create attendance reports for all groups. Group type managers can only create attendance reports for group types they manage.
Select the Reports page from the top navigation.
Select the Attendance tab.
(Optional) Select Filter in the top left to filter by group type, campus, status, or tags.
Use the dropdown in the top left of the Event attendance graph to choose a timeframe for your report.
Use the tabs in the top right to adjust how the Event attendance graph displays data.
Year/Month/Week/Day: Depending on your selected timeframe, you can choose whether to sort attendance data by year, month, week, or day.
%/Avg/Sum: Choose whether to view the percentage of the overall membership (%), the average attendance numbers (Avg), or the raw attendance numbers (Sum).
Scroll down to the Attendance by group section to review each group's attendance numbers for the selected timeframe.
The columns show the average percentage attended (Avg %), the median number of typical attendees (Typical Attd), and the total number of group events for the selected timeframe (Events).
Select the Avg % or Events column headers to sort the list by average percentage attended or total group events.
(Optional) Select the 🖨️ print icon in the top right of the Reports page to open a print preview of your report. Use your browser's printing feature to print a report from the preview page.
Select the CSV Export button in the top right of the graph.
In the popup, preview the data to be included in your event attendance export and make any desired changes.
Select Create Export to send yourself an email with the CSV download link.