Add or import people
You can add people in Services by importing multiple people from a CSV file in Planning Center People or adding them individually.
Important
Your Planning Center People database allows for unlimited people, but Services is priced based on the number of team members. When you add a person to Services, they count against the number of team members included in the pricing package.
Import multiple new people from a CSV file
The CSV import options are only available to organization administrators.
Select the People page from the top navigation in Services.
Select the ⚙️ settings icon in the top right corner.
Choose CSV Import from the dropdown to go to the Data import & export page in People.
Select the Start import button.
Drag and drop your CSV file into the window.
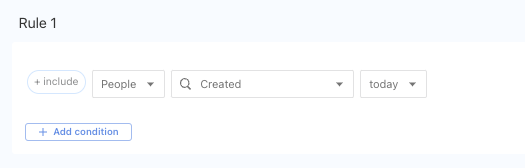
After the CSV file is imported, create a list to find people created on the day of the import.
 |
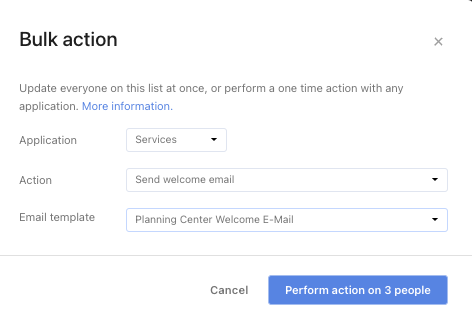
Once you have the list of people, use a bulk action to send them a Services welcome email, where they can create their password and log in to Services.
Now, you can use an automation from a People list or bulk editing in Services to assign people to teams.
Add a new person to Services
Select the People page from the top navigation in Services.
Select the Add person button in the top right corner.
Type the person's name in the search box.
If the person already has a profile in your organization, select their name from the search box dropdown and choose the Yes, add to Services button in the popup.
If the person does not have an existing profile in your organization, select Create a new person from the search box dropdown. Enter the person's profile details and select Save.
Select the level of permissions this person should have in Services.
Choose whether or not to send this person a welcome email and add the required tags.
To finish, select Submit at the bottom.
If you’d like to see the steps above in action, check out the video below.
Update a person's profile
In the person's profile, add any scheduling preferences or teams from the Scheduling tab.
If you know which folder the person will be in most of the time, choose that folder as the Current Folder from the Details tab. When they log in, they will automatically be taken to this folder or service type on the Plans page.
Send welcome email
When you import a person, you can send a welcome email. You can also resend it at any time by selecting the email address in the header of their profile. This welcome email sends different text depending on the person's permission.
The default welcome email template is available, but you can also create a custom welcome email template for your church.
When editing this email, pay attention to the code inside the curly braces {{ }}:
All users are sent the final paragraph after
{% endif %}.If the recipients have scheduler permissions or higher, the two paragraphs under
{% if to.scheduler_at_all? %}about setting up and learning how to schedule are included. Those two paragraphs are left out if their permissions are lower than scheduler.