Software and hardware for Check-Ins
Check-Ins can be scaled to your ministry's needs. Depending on your situation, specific devices, printers, network settings, and accessories will better suit your organization and optimize your Check-Ins experience. This article provides compatibility requirements and best recommendations for station devices, printers, and more.
Review printer and connection recommendations
Check-Ins is compatible with multiple printer brands and models, depending on your station device type. The table below shows printer brand compatibility at a glance. Select the brand name for detailed specifications and setup instructions.
Print from Mac/Windows station device | ✓ | ✓ | ✓ | |
Print from iOS/Android station device | ✓ | ✓ | ✓ | |
Uses Wi-Fi | ✓ | ✓ | ||
Uses Bluetooth | ✓ | ✓ | ✓ | |
Battery option | ✓ | ✓ | ||
Connect to multiple devices (up to two) | * | * | ✓ Built-in |
|
Printing speed (1=Fastest) | 1 | 2 | 3 | 4 |
*Use the Print to another station feature in Check-Ins to connect to multiple devices (up to two).
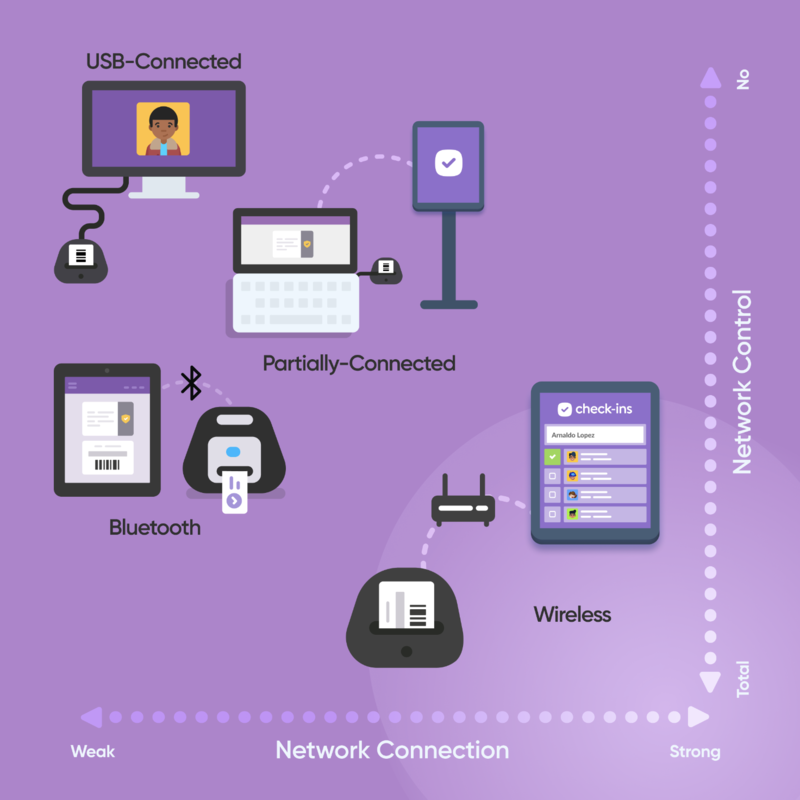
Churches and ministries facilitate check-in in various ways, depending on factors like Wi-Fi network reliability and physical space. Consider your network connection and control, then check out the recommended setups below based on those factors.
Tip
In most cases, a computer with a hardwired, USB-connected label printer is recommended as it is the most reliable setup.
Wi-Fi network
How much control do you have over your network? Can you adjust firewall settings, move access points, open/close ports, and add/remove channels?
How reliable is your connection to the network? Does the internet drop frequently? Do you have a poor signal at your check-in location?
Physical space
Where are the nearest power outlets? Do you need fully mobile stations, or can they be set up near an outlet?
How many stations do you want to set up in your space?
How much traffic will gather in your space?
Best fit for Wi-Fi printers |
|
Best fit for USB-connected printers or Bluetooth printers |
|
Pick your station devices
To use Check-Ins, you need a computer, phone, or tablet with internet access. To check in people using that device, download and install the Check-Ins app (available for Mac, Windows, Android, or iOS).
Mac and Windows devices
Although Check-Ins may work with some older operating systems, we highly recommend purchasing devices compatible with the latest Mac or Windows release.
Android devices
Choose the newest name-brand model your budget allows. Avoid older or off-brand devices, since they're more likely to have printer issues and won't last as long. Some models have extra considerations:
Kindle Fire: Choose the latest Fire HD, and avoid older models.
Chromebooks: Choose an Android-supported model, and pair it with a Brother 820NWBc. USB printing is not supported.
iOS devices
Choose an iPad that runs the latest iOS. If you're on a budget, consider a Wi-Fi-only iPad mini with lower storage.
Tip
If you plan to scan barcodes or QR codes, it is recommended that you use iOS/Android devices over Mac/Windows devices. Mobile devices have built-in cameras, so you do not need to purchase a separate scanner if you use one.
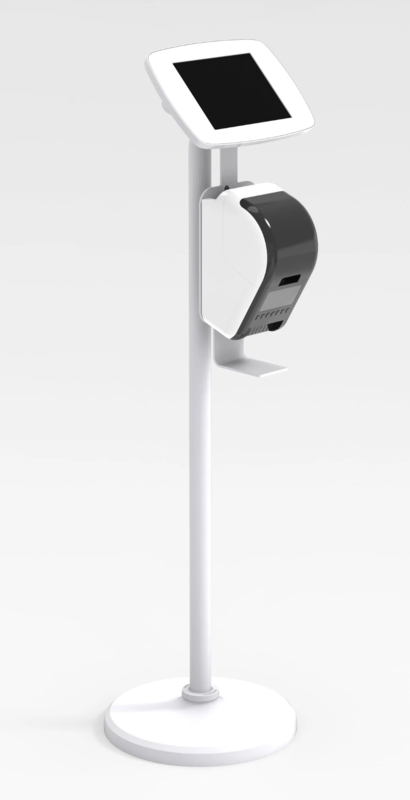
Consider a kiosk or device/printer stand
To keep your check-in area tidy and make moving stations simpler, invest in a stand that holds your mobile device and label printer.
This standing kiosk has a Brother printer mount and a case for your tablet, making it an excellent option if you only have one tablet.
 |
For the full spectrum of kiosk ideas, join our Planning Center communities!
Configure your Wi-Fi network
It's best if Check-Ins devices are given priority on a closed, managed network and are near access points/routers. With that in mind, here are the other considerations:
Check-Ins requires access to these external sites to print a label.
Edit your wireless network: Under Advanced Options, uncheck Block LAN to WLAN Multicast and Broadcast Data.
Manage your access points:
Balance multiple access points so that overlapping channels are physically as far apart as possible.
Adjust the signal level to be sufficient for the coverage area but not bleeding too far into the next access point zone that shares the same channel.
Set the minimum bitrate to 12 or higher if possible. This setting affects airtime usage in the 2.4GHz range, directly impacting interference levels in a multi-access point environment.
Use either your access points or a software-based tool as a monitor to show real-time interference/noise levels.
Capture data during busy times, when there are people and the most traffic is in the building, and during idle times, when fewer devices are in use, and fewer people are around.
Compare the two to identify any drastic differences and determine which channels have the highest noise level, then use the channels with the least noise. Once the data is obtained, it will be easier to guide which channels are best used.
Give priority to the Check-Ins devices on your network. If the network or access point has a limit on the number of allowed connections, ensure the Check-Ins devices are not bumped.
Adjust the channel selection in regard to placement and radio power for each of your access points. Which channel you use depends on your environment's noise level and what channels are available regionally. The three 2.4GHz channels available in the US are 1, 6, and 11.
Important
Brother printers can only connect to 2.4GHz channels. Most routers use a single SSID for both 2.4 and 5GHz bands. Separate these frequencies (by changing paraphrases/SSID) to ensure a more stable printer connection.
Using scanners to check in
Checking in by scanning barcodes or QR codes is extremely fast. When you scan a barcode or mobile pass, or use the Church Center app, the whole family can check in at a self or manned station.
On Android or iOS stations, you can scan using the device's built-in camera OR connect a Bluetooth scanner. For the fastest check-in possible, use a Bluetooth scanner. Scanners act like keyboards, instantly adding an ‘enter’ key (or carriage return) after the scan.
On Windows or Mac stations, you'll need to purchase an external scanner. Check out the external scanners section below to learn more.
Important
Scanners replace the keyboard on your device, so you won't be able to type on the screen. You must unplug or turn off the scanner if you need to type.
Existing or custom barcodes
If you'd like to scan barcodes instead of the Church Center app or mobile pass, you can either use barcodes people already carry on them or order some tags to give out to your people.
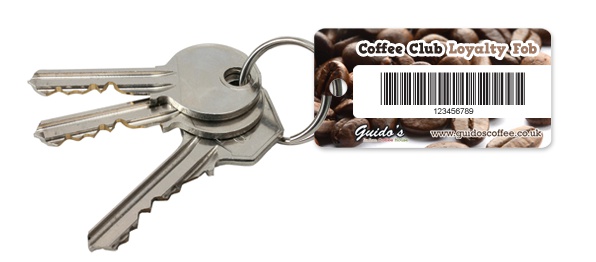 |
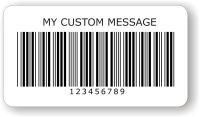
You can buy a collection of already printed barcode tags or make your own. Make sure you account for these settings:
Select Code 39 or 128 barcode symbology to work with both 1D scanners and mobile devices.
If you're using only mobile devices or 2D scanners, order tags with QR codes instead of 1D barcodes, as QR codes scan quicker.
Do not use 4-, 7-, or 10-digit long codes since they may interfere with phone numbers.
If you create a custom Dymo label with a barcode, use Code 39 from the Symbology dropdown.
 |
External scanners
Any 2D scanner supported by your device will work with Check-Ins for scanning security labels, key tags, QR codes, and mobile passes. This scanner must be programmed to add an 'enter' key (or carriage return) after the scan, which is referred to as a suffix.
Check your scanner's manual for barcodes to program and change settings.
Troubleshooting
Barcodes not scanning? All barcode scanners act as external keyboards for your computer, but not all do so by default. If your barcodes aren't scanning, scan a code and press ‘enter’ on your keyboard. If that works, program your barcode scanner to add an ‘enter’ key after each scan. Check the manual that came with the device for instructions.