Create a station
A station is any device used to facilitate checking in. There are no limits to the number of stations you can create for your church! Consider whether your volunteers will be operating the station when determining the type of station to set up.
Once the Check-Ins app has been downloaded on your device, you have several options to create stations:
Have an administrator log in to the station device.
Have an administrator scan the QR code shown on the station device and then log in using their personal device.
Have an administrator activate the station using Check-Ins on a web browser.
You must have Check-Ins editor permissions to create a station.
Tip
Set up your stations a few days before you need them, so you'll have plenty of time to test before your event!
Log in to a station device
If you're a Check-Ins editor, you can set up any device as a station by logging into it. When creating a station with your login information, you can use the New Station wizard to set your station settings from scratch.
Open the Check-Ins app on the device you want to set up as a station.
Select More options below the QR code.
Select Use your credentials.
Enter your login information in the following screen.
Follow the prompts in the New Station wizard to set up your new station.
If you're unsure of any settings, you can save your station and edit the settings later while using Check-Ins on a web browser.
Scan a QR code
You can scan a QR code to set up another device as a station! This can be helpful if you need to set up a volunteer's device as a station, or if you need to activate a station away from your desktop. When creating a station using a QR code, you can choose a quick station to apply preset station settings.
Open the Check-Ins app on the device you want to set up as a station.
Use your personal device to scan the QR code.
Enter your Planning Center login information into your personal device.
Select Log in to open the Activate a new station page on your personal device.
(Optional) Choose whether to create a New Station or pair the device with an Existing station.
If you're creating a new station, enter a station name.
Choose a Quick station from the dropdown to apply preset station settings to your new station.
Select Create station.
Select Yes, Create it in the confirmation popup.
Activate a new station on the web
You can also use Check-Ins on a web browser (desktop or mobile) to activate the current device or another device as a station. When you activate a station from the web, you can choose a quick station to apply preset station settings.
To activate the current device as a new station:
Select the Stations page in the top navigation.
Select Launch station in the top right.
Select Launch app below the Use this device section to open the Check-Ins app (if it's installed).
Select More options below the QR code.
Go to planningcenter.com/station in your web browser to open the Activate a new station page.
Enter the code from the Check-Ins app into the Code field of the Activate a new station page.
(Optional) Choose whether to create a New station or to pair this device with an Existing Station.
If you're creating a new station, enter a station name.
Choose a Quick station from the dropdown to apply preset station settings to your new station.
Select Create station.
Select Yes, Create it in the confirmation popup.
To activate another device as a new station:
Select the Stations page in the top navigation.
Select Launch station in the top right.
Select Activate station below the Use another device section.
Open the Check-Ins app on the other device and select More options below the QR code.
Enter the code shown on the other device into the Code field of the Activate a new station page.
(Optional) Choose whether to create a New station or to pair this device with an Existing Station.
If you're creating a new station, enter a station name.
Choose a Quick station from the dropdown to apply preset station settings to your new station.
Select Create station.
Select Yes, Create it in the confirmation popup.
Once the station is set up, you can launch it by opening the Check-Ins app on the station device.
Important
If you see the “Something went wrong!” error when creating stations using the alphanumeric code, double-check that Check-Ins is the active app on the station device when the administrator selects Create station. Keep the Check-Ins app open and at the front to create the station successfully.
If you’d like to see the steps above in action, check out the video below.
Set up quick stations
Quick station presets allow you to apply predetermined settings to new stations for faster setup. Create new quick station presets for different station types (manned, self, roster) or events (Sunday Services, Daycare, etc.)
Tip
A default quick station preset is automatically added to every account, which sets new stations to the self station type.
Follow these steps to create a new quick station:
Select the Stations page from the top navigation.
Select the ⚙️ settings icon in the top right.
Choose Quick stations from the dropdown.
Select New quick station in the top right corner.
On the New quick station page, enter a name for the quick station.
Choose which station type to use, and select your preferred options.
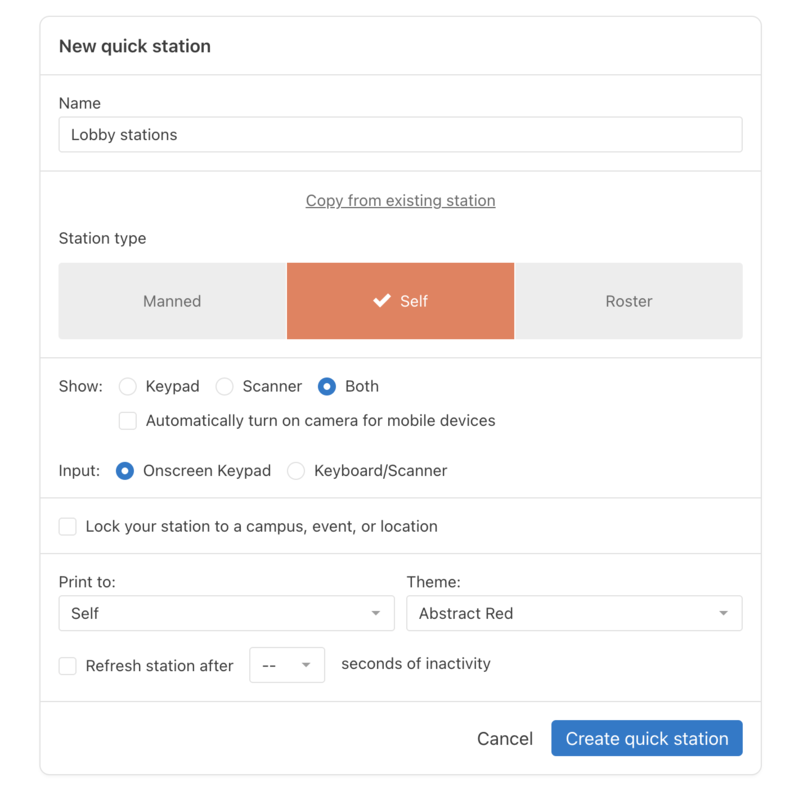
To finish, select Create quick station.
Station type comparison
A trusted volunteer can use a manned station to check people in, add new visitors, and edit profile information.
Since manned stations allow you to view and edit profile information, only give manned station access to volunteers you trust with that information. Send this video to your volunteers so they can see how a manned station works!
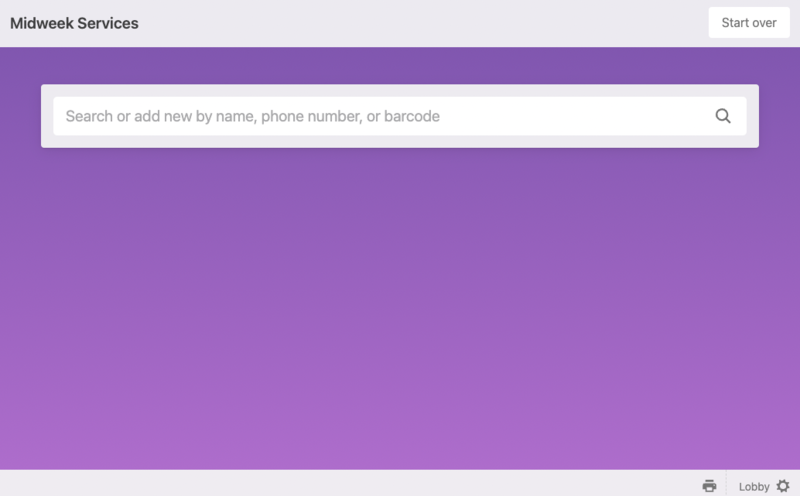 |
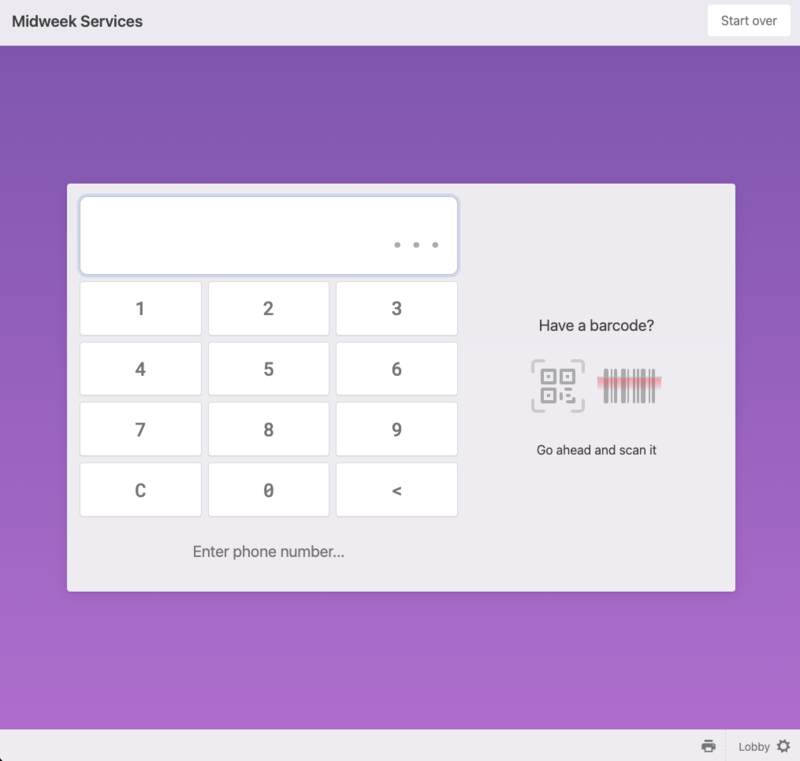
A self station allows a person to check in members of their household (or the children of a household they're a trusted person for) by checking in with their phone number or scanning a code. It's used by returning families who have checked in before. No staff or volunteer person is required.
Send this video to your volunteers, so they can see how a self station works!
 |
A roster station is a digital class list that allows a teacher to check who arrives at their class. Rosters are populated based on the people who have previously checked into the location or event.
Send this video to your volunteers so they can see how a roster station works!
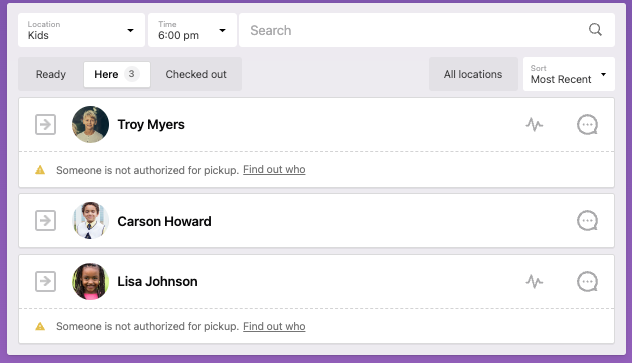 |
If you don't need teachers to check in students but want them to have access to a class list of people who are currently checked in, set the station to show the Here tab from the station settings.
Tip
Want to auto-populate rosters?
A roster station is populated when people check in to the event, based on the number of days or weeks you choose in the station settings. A roster station will not show any names on the list until an event has recorded check-ins for that number of days or weeks. If you want a roster station to show names, you can add past sessions with those people listed in them.