Create a workflow
If you have a step-by-step process for when someone attends your church for the first time, applies to serve on a team, or becomes a member, create a workflow that makes it easy for your team to track a person's progress and communication through each step. For workflow examples, check out some common workflows.
Tip
Duplicate an existing workflow to create a new workflow with the same steps, descriptions, step settings, campus, and category.
Only managers in People or viewers and editors with the Can create workflows option checked in their permissions can create a workflow.
Create a new workflow
Select the Workflows page from the top navigation.
Select the New workflow button in the top right corner.
Name the workflow and assign it to a campus and/or category.
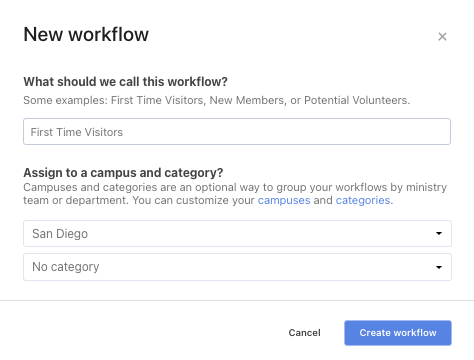
Select Create workflow.
Add a step
Each step is a job that a team member will complete, and you can create multiple steps for each workflow to track where people are in the process.
If you're adding the first step to a workflow: On the Steps tab of your new workflow, select the Add a step button.
If you're adding an additional step to a workflow: On the Steps tab of the workflow, select the three-dots icon in the Workflow steps sidebar and choose Add step from the dropdown.
In the pop-up, add a name for the step so the assignee knows what to do at a glance.
(Optional) Add a description to give the assignee more direction on completing the step, such as an email template or phone call script to follow.
(Optional) Select Skip this step in some conditions to configure this step to skip based on a set of conditions you set. Conditions are defined using the same logic as lists in People.
(Optional) If steps need time between them, select Auto snooze for... and choose how long to snooze before notifying the assignee of this step.
Unless you've already added collaborators to your workflow, skip the option to assign to a person. The default assignee is the person who creates the workflow, and you can't choose a different assignee until you share the workflow with others. (Which is covered in this article, in the section below.)
(Optional) Select Mark overdue after... and choose a timeframe. Cards that exceed the timeframe you set receive an overdue badge, which you can use to filter your step vie, to show only overdue cards.
Select Create step at the bottom of the pop-up.
Add collaborators
If you want to change the assignee on a step, you must first add collaborators to your workflow. Collaborators can edit their own cards, edit all cards, or manage the workflow, depending on the level of access given to them by the workflow's creator.
Select the Settings tab at the top of your workflow.
Select the Add collaborator dropdown.
To add a group of collaborators, choose the group from the dropdown.
To add an individual collaborator, choose A person... from the dropdown and search their name.
Change the assignee for a step
Once you've added collaborators to your workflow, follow the steps below to change the assignee for a step.
Select the Steps tab at the top of your workflow.
In the left sidebar, select the step you'd like to reassign to a collaborator.
Select the three-dots icon in the top right corner.
Choose Edit step from the dropdown.
In the pop-up, select the Change button in the Default assignee section.
Type the new assignee's name in the search box.
Select the new assignee's name from the search results.
Choose how broadly to apply this change:
This step only: Update only the step you're editing.
This step and any without a default assignee: Fill in the gaps across the workflow without overwriting steps that already have someone assigned to them.
All steps in this workflow: Set every step in the workflow to the new assignee.
Select the Save button at the bottom of the pop-up.
Customize your view
There are three global view settings at the top of the page that allow you to filter and sort your view across all steps:
Ready/Snoozed: Toggle between these two options to view only cards that are either ready or snoozed.
Assignee: Use this filter to view cards assigned to individuals, or use the All assignees option to view every card in the step at once, regardless of who it's assigned to.
Sort: You can sort cards by date, first name, or last name.
Step counts and the assignee dropdown update dynamically based on your filters, and when you're viewing the full team's cards, you can spot your cards by their blue left border and your name highlighted in blue.
Edit a step
Select the Steps tab at the top of your workflow.
In the left sidebar, select the step you'd like to edit.
Select the three-dots icon in the top right of the step.
Choose Edit step from the dropdown.
In the pop-up, make your desired changes.
Select the Save button at the bottom of the pop-up.
Reorder steps
Select the Steps tab at the top of your workflow.
Select the three-dots icon at the top of the Workflow steps sidebar on the left.
Choose Reorder steps from the dropdown.
Drag and drop the steps to their desired order.
Select Save.
Delete a step
Select the Steps tab at the top of your workflow.
In the left sidebar, select the step you'd like to delete.
Select the three-dots icon in the top right of the step.
Choose Edit step from the dropdown.
Select the Delete step button at the bottom of the popup.
Select the Delete step button in the warning popup.
After you delete a step, any card that has previously completed the step will maintain a record of it, but the step no longer applies to new cards.
Add a card
A card tracks a unique person's progress through the workflow. Cards include that person's basic information and details about their path through the workflow.
Select the Steps tab at the top of your workflow.
Select Add card in the top right.
Type the person's name in the search box.
If the person does have an existing profile, select their name from the dropdown.
If the person does not have an existing profile, select Create a new person from the dropdown.
Select Add person.
Tip
If you want someone other than the default assignee to follow up with a card, assign and pin the card to a different workflow collaborator.
The step's assignee will be notified in the Admin Notification Inbox and by email. Emails are delayed by ten minutes to group multiple card assignments.