Manage two-step verification
Security for your account is extremely important. To protect the information stored within your account, two-step verification is available for anyone who can log in to Planning Center.
Organization administrators can see who has two-step verification enabled, require it to be turned on, and deactivate it if someone loses their backup code.
For more information about two-step verification, check out this video.
View a person's two-step verification status
An organization administrator can see who has enabled two-step verification from the People page in Account settings.
Select People in the top navigation.
Select Administrators on the left to view organization administrators and billing managers.
Select Product Users on the left to view everyone with login access. Product users does not include those with only access to Services.
Check the Login Verification column to see if a person has two-step verification enabled.
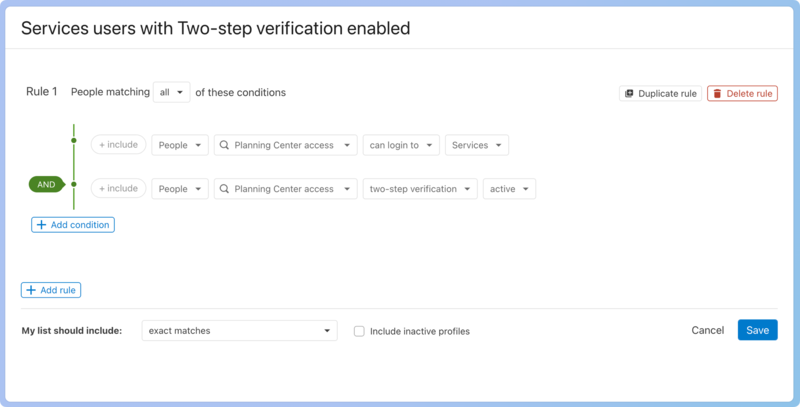
To see the two-step verification status of people who can log into Services, create a list in People using the following rules.
Select Lists in the top navigation in People.
Select New list.
Select Add rule.
Choose Planning Center access in the Select a condition box.
Select can log into and Services in the following two boxes.
Select Add condition.
Choose Planning Center access in the Select a condition box.
Select two-step verification and active in the following two boxes.
Select Save.
Deactivate two-step verification for a person
An organization administrator can deactivate two-step verification for someone who has lost their emergency backup code.
Warning
Organization administrators must have two-step verification enabled for their own profile before deactivating it for another person.
In People, search for a person's profile using the 🔎 search icon in the top navigation.
Select their profile.
Select Actions next to Planning Center login.
Choose Provide help from the dropdown.
Choose They can't log in because of two-step verification on the Account Login Help page.
Select Continue.
Read the warning on the Disable 2-Step Verification page and type I understand the risk to acknowledge the risk.
Select Disable two-step verification.
Once two-step verification is deactivated, they can set up a new two-step verification method.
Require two-step verification
Requiring organization administrators and billing managers to use two-step verification is one of the best ways to protect your account. There are two ways to enforce it: either requiring it immediately or choosing a future enforcement date.
Warning
Organization administrators must have two-step verification enabled for their own profile before requiring it for other organization administrators and billing managers.
Require two-step verification immediately
Requiring two-step verification provides instant protection for your account. Organization administrators and billing managers who haven't enabled two-step verification will be logged out and must complete setup before logging back in.
Select the People page in the top navigation.
Select Enable in the Two-step verification requirement box.
Choose Require immediately.
Select Next step.
Choose a From address. You can choose between the emails listed on your profile or your organization's email. This will be the reply-to email address.
In the Message box, edit the text of the email to be sent to affected users in your account.
Select Notify and log out users.
Set a future enforcement date
Choose a future date for requiring two-step verification to give people time to get set up. Organization administrators and billing managers who haven't enabled two-step verification by the set enforcement date will be logged out and must complete setup before logging back in.
Select People in the top navigation.
Select Enable in the Two-step verification requirement box.
Choose Require on a future date.
Select the 🗓️ calendar icon to choose an enforcement date.
Select Next step.
Choose a From address. You can choose between the emails listed on your profile or your organization's email. This will be the reply-to email address.
In the Message box, edit the text of the email to be sent to affected users in your account.
Select Schedule and send.
Encourage people to set up two-step verification
Encourage those who have not yet enabled two-step verification to set it up by creating a list in People and then emailing those individuals.
Use these rules to create your list:
Select Lists in the top navigation in People.
Select New list.
Select Add rule.
Choose Planning Center access in the Select a condition box.
Select two-step verification and inactive in the following two boxes.
Select Add rule.
Choose Planning Center access in the Select a condition box.
Select can login to and Accounts in the following two boxes.
Select Add condition
At the top of Rule 2, change People matching all of these conditions to People matching any of these conditions using the dropdown.
In the second condition, choose Planning Center access in the Select a condition box.
Select can login to and Calendar in the following two boxes.
Repeat step 12 for each product.
After creating all conditions for Rule 2, select Save.
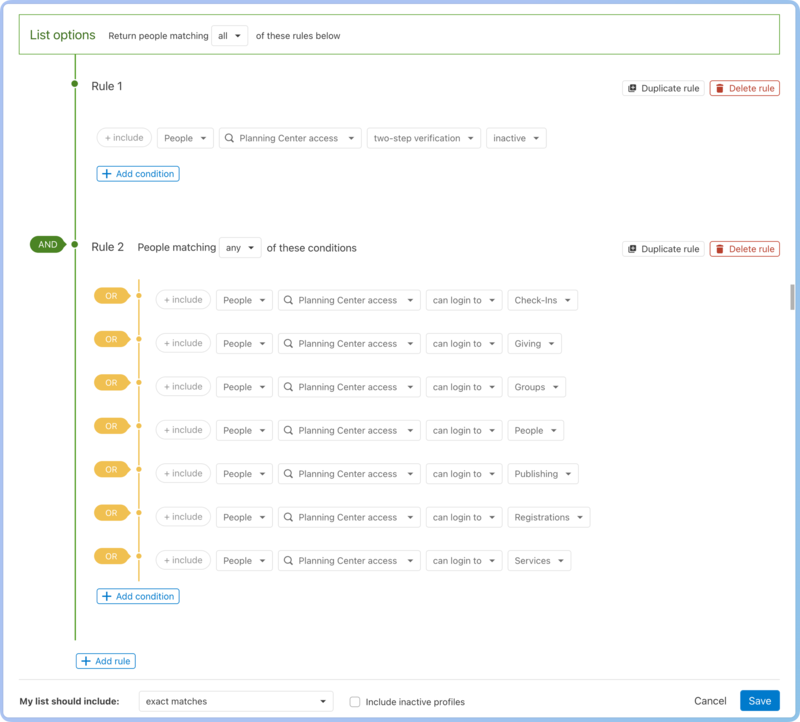
Important
Everyone except billing managers will appear on this list.