Track attendance with Headcounts
The Headcounts feature in Check-Ins lets you record the number of attendees at an event without tracking individual details like names, ages, grades, etc. For example, you can track the number of cars in the parking lot, baptisms, hand raises, or people in the Sanctuary.
Headcounts don't affect your daily Check-In limit and are available on all Check-Ins plans, including the free plan!
You can access Headcounts from the Headcounts tab of any event in Check-Ins or through the Headcounts mobile app for Android or iOS. To log in to the Headcounts mobile app, you must have editor or headcounter permissions.
Important
Headcounts relies on Check-Ins event times, so be sure to add times to your event before getting started.
Check out this video for real examples of how your volunteers can use Headcounts!
Download the video using the export button on the toolbar, or use this link to share it.
Use the Headcounts mobile app
The Headcounts mobile app allows you to take attendance and set capacity limits for each headcount type. The app is compatible with: iOS version 13 or later, and Android version 6 or later (Amazon Fire devices must be 2018 or newer).
Take attendance
Tap the menu icon in the top left or swipe right on the screen to open the events sidebar menu.
Choose the event you're tracking to open the event's dashboard page.
In the graph, you can view attendance information for past dates and choose a specific date to modify the count.
(Optional) If you need to edit the Headcount Types, select Edit Headcount Types at the bottom of the page.
Under the date, tap a Headcount Type to add attendance.
On the left of each service time, tap the ➕ plus sign/➖ minus icon button to open the Clicker screen.
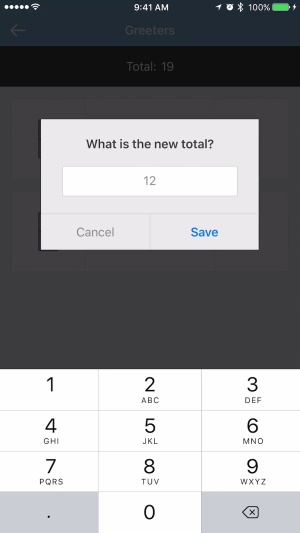
(Optional) On the right of each service time, tap the number to manually type in or override the total attendance count.
On the Clicker screen, tap the ➕ plus sign or ➖ minus sign icons to add or remove attendance counts.
Go back to the event's dashboard page and repeat steps 5-8 to add attendance for each Headcount Type.
Important
If a service time is incorrect, an administrator will need to change it from the event in Check-Ins.
Tip
From the events sidebar menu, tap Settings to enable sounds and/or vibrate for each tap. Vibrations will increase as you get close to your capacity or go over it.
When using the clicker to take attendance, the total count updates automatically in real time, even if multiple people are taking attendance at once. The clicker also calculates the remaining seats.
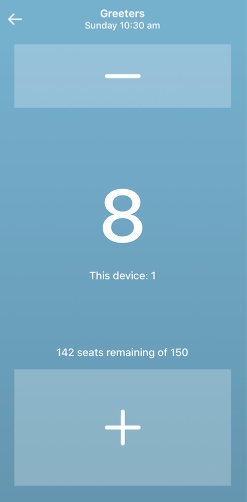
Once the total attendance is at 90% of capacity, the screen turns yellow. If attendance hits the maximum capacity, the screen turns red.
Entering a total on the right of each service time overrides the clicker count and any previous inputs. It replaces the existing total rather than adding to it.
Capacity
Set capacity to keep track of how many people can fit in the building and know how much space you have left.
From the event's dashboard page, tap a Headcount Type.
At the top of the screen, tap Set Capacity Limit.
Toggle on the Capacity Limit setting.
Enter the capacity in the text box.
Tap Save when you're done.
In the top left corner, tap Cancel to return to the event's dashboard page.
(Optional) Repeat steps 1-6 for each Headcount Type.
Headcounts tab in Check-Ins
The Headcounts tab displays totals from standard headcounts and custom headcounts you've set up manually. To access the Headcounts tab, you will need viewer or editor permissions.
Standard headcounts show individuals who have been checked in at a station or added to the Check-Ins tab. They cannot be edited from the Headcounts tab.
Custom headcounts help you track general attendance numbers and can also be found in the Headcounts mobile app. When you create a custom headcount, you can assign it a name and color. These will appear on the event chart in the selected color.
Important
If custom headcounts are tracking the same individuals who check in at a station using standard headcounts, they'll be counted twice, which can inflate your attendance totals.
Follow these steps to view standard headcounts totals and manually enter custom headcounts:
In your event, select the Headcounts tab.
View your standard headcounts totals.
Enter counts for each headcount type.
Warning
If you delete a headcount type, you will lose all data entered for it.
Event chart
Once you've entered attendance in the Headcounts mobile app or the Headcounts tab in Check-Ins, you can view your attendance based on date, event, and time.
Select Events from the top navigation.
Near the top of the page, choose a time frame to display in the chart.
Change the chart to display data by day, week, month, or year.
Select All events to view all your events on the chart, or check the boxes to the right of specific events.
(Optional) If you've checked the box to view a single event, an Options button appears. Select it to group data by kind or location and view all or specific locations, times, kinds, and headcount types. You can Clear all selections with the exception of times and headcounts if you'd like to view only headcounts attendance.
Hover over a bar on the chart to get more information about that specific date's attendance numbers.
(Optional) Select the Export CSV button to download a CSV file of what's show on the chart.
Tip
If you want to import past general attendance from another system, please contact Planning Center Support.