Create and use station keys
Set up station keys for each staff member or volunteer so they can update station settings directly on the station device. Once someone has a station key, they can use it to edit any station at your church.
People with editor permissions can set up station keys by using Check-Ins on a web browser.
With a station key, you can quickly adjust:
Station type (manned, self, or roster)
Print station
Theme
The event and location to which the station is locked
Station refresh settings
Speed tip suggestions
Create station keys
From a web browser, follow the steps below to create new station keys:
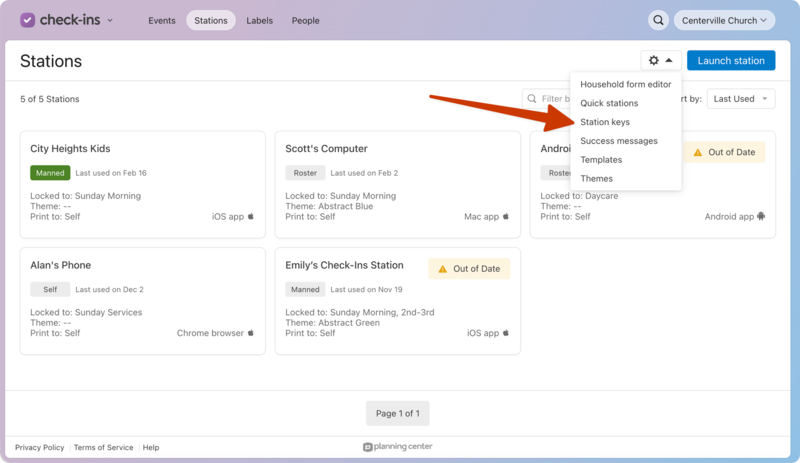
Select the Stations page from the top navigation in Check-Ins.
Select the ⚙️ settings icon in the top right.
Choose Station keys from the dropdown.
In the popup, select Add Key to create a new key.
Add a name and pin number.
Select Create Key to save it.
Select Close to exit the popup.
Use a key at a station
Once you've created individual keys, your staff or volunteers can use them directly at a station to make changes when needed.
Open the Check-Ins app on your station device.
Select the ⚙️ settings icon in the bottom right corner.
Tip
In addition to station settings, you can change the printer settings on mobile devices without entering a station key.
Enter your station key.
Tap Login to go to the station settings.
Make any desired changes.
Select Save.
Manage station keys
People with editor permissions can view, edit, or delete station keys by using Check-Ins on a web browser.
View station keys
If you need to remind staff or volunteers of their set pin numbers, view them by following these steps in a web browser:
Select the Stations page from the top navigation in Check-Ins.
Select the ⚙️ settings icon in the top right.
Choose Station keys from the dropdown.
In the popup, select Show Pin.
When you're done, select Hide Pin.
Select Close to exit the popup.
Edit a station key
From a web browser, follow the steps below to edit an existing key:
Select the Stations page from the top navigation in Check-Ins.
Select the ⚙️ settings icon in the top right.
Choose Station keys from the dropdown.
In the popup, select Edit next to the key you want to change.
Make the desired changes to the name or pin number.
Select Update Key when you're done.
Select Close to exit the popup.
Delete a station key
From a web browser, follow the steps below to delete an existing key:
Select the Stations page from the top navigation in Check-Ins.
Select the ⚙️ settings icon in the top right.
Choose Station keys from the dropdown.
In the popup, select Edit next to the key you want to delete.
Select Delete to permanently delete the key.
Select Close to exit the popup.
View station key history
If you need to see when keys were created, edited, or deleted, you can view station key history on a web browser.
Select the Stations page from the top navigation in Check-Ins.
Select the ⚙️ settings icon in the top right.
Choose Station keys from the dropdown.
Select the History tab at the top of the popup.
Select Close to exit the popup.