Set billing information
Organization administrators and billing managers can manage your account's billing information from the Subscriptions page in Account settings.
You can set your payment method, frequency, and billing address from the Billing Info tab. Access your payment history, receipts, and information about failed charges from the Billing History tab.
Organization administrators can also register for a toll-free number to use for outgoing messaging and Text2Give, and purchase outgoing text message credits from the Subscriptions page.
Important
USD is the only supported currency for subscription payments.
Add or update payment information
You can add or update your account's payment information from the Billing Info tab on the Subscriptions page.
Select Subscriptions in the top navigation in Account settings.
Choose Billing Info on the left.
Select Edit frequency in the Subscription box to update your payment frequency. You can make payments monthly, quarterly, every six months, or annually.
Update the account's payment method by selecting Edit payment in the Card information box. To update your card information, remove the card and re-enter the card information.
Select Edit address in the Billing address box to update the account's billing address. This address determines whether or not you are required to pay sales tax.
Your card will be automatically charged on the date listed in the Subscription box based on your payment frequency.
Important
If you live in a state that charges sales tax and are eligible for an exemption certificate, you will also see the option to upload a tax exemption certificate.
After your credit card information is saved:
In most cases, your card will be charged on your next payment date. If your card has expired or your account is past due, your card will be charged immediately.
Each time your credit card is charged, the amount is credited to your account. If you pay every three, six, or twelve months, your card is charged toward your prepaid balance. Your monthly cost is then deducted from that balance.
The billing manager will receive a monthly email telling them how much was paid.
If you have a prepaid balance due to a subscription change:
If you upgrade or downgrade your subscription in the middle of a billing cycle, the new subscription level will be in effect immediately. However, you will not be billed for the new payment amount until your next payment date.
Your card will be charged when your pre-paid balance is insufficient to cover your next monthly payment. This could be sooner or later than the payment frequency you initially set if your subscription costs have changed since then.
What happens when a payment fails or your card is declined
Your account will never be canceled, but if your payment doesn't arrive by the renewal date, some features may be disrupted.
If your credit card is declined, you can re-run a card by following these steps.
Select Subscriptions in the top navigation.
Select Billing Info on the left.
In the Card information box, select Edit payment.
In the bottom left, select Remove card...
In the warning popup, select Remove card to confirm you'd like to delete the card on file.
Enter the card details once more.
Select Add card. If a payment is due, your card will be charged immediately.
If the card declines more than once, contact your credit card company or bank to ensure they aren't blocking any payments to Planning Center.
View payment history and receipts
Billing managers receive an emailed statement or receipt for each transaction on the account. Organization administrators and billing managers can access these statements from the Billing History tab on the Subscriptions page.
Select Subscriptions in the top navigation.
Select Billing History on the left.
Choose a date to view the details of that payment or print the receipt.
Tip
For card payments, you can access receipts without logging in by visiting the charges page and entering the last four digits of the card used and your billing zip code.
To send outgoing messages, you must purchase credits, which cost $0.02 each. This cost is in addition to the $5.00 monthly fee to maintain your toll-free number. If you only use text messaging to receive donations via Text2Give, you do not need to purchase outgoing text message credits.
Select the product name in the top navigation and choose Account settings from the dropdown.
Select the Subscriptions page from the top navigation.
Select the Text Messaging tab on the left.
In the Purchase outgoing text message credits section, use the dropdown to choose the number of credits you need.
Select the Purchase credits button to confirm your payment.
You will always know how many credits a message will cost before it is sent.
An organization administrator can enable auto-refill in account settings. This optional setting allows your organization to automatically purchase additional SMS credits when your account drops below a set threshold.
Credits are purchased as needed and never expire. If you run out of credits, you'll be prompted to buy more when composing your text message.
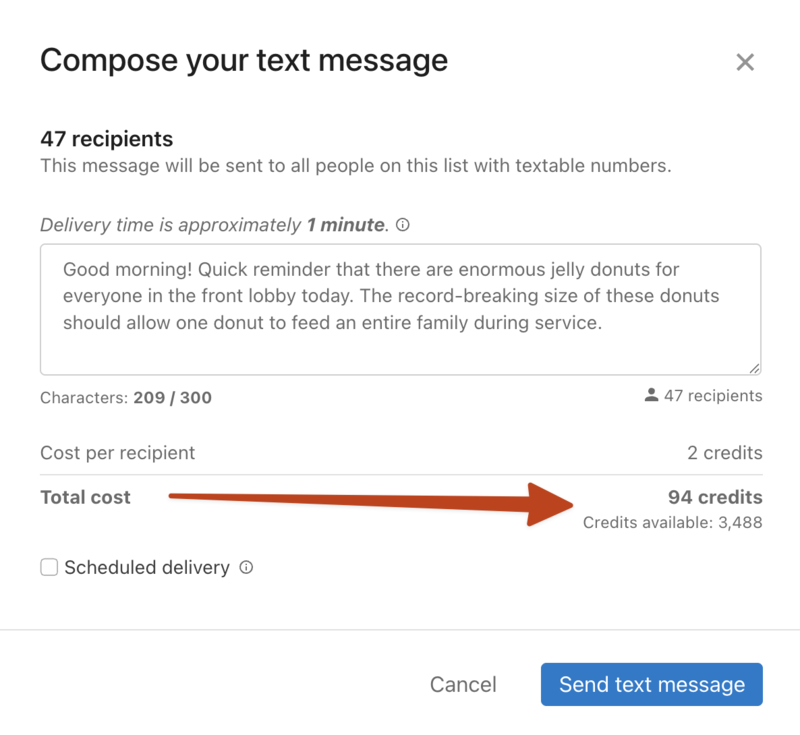
Total cost: A credit is one text message of up to 160 standard characters to one recipient. Messages using more than 160 characters will be broken into two messages, with a 300-character total limit. The message size limit will decrease if your message uses special characters like emoji. Special characters are any characters not found in the GSM-7 encoding standard.